Project Hub workspace · version 0.217.0 · 15 October 2026
Project Hub, explained for first-timers
Your guide to Project Hub. Projects is where the daily work happens, People & access is who can do it, and Settings is the workshop behind it all.
Hi, I am Snappy. I know my way around Project Hub.Projects, people, settings, no traps. Follow the purple dots and you will be fine.Nothing is stored until you press Save.
Pick a category
People often look for
Searching. Type in the box at the top, or press / anywhere. Results update as you type; press Enter to open the first one.
Start here
Three guides help you get going with Project Hub. Pick the one that matches what you want to do.
Guide
Use it when you want to
Format
Client journey guide
Follow one job from enquiry to payment and completion, and see what you and your team do at each stage
8-page PDF
Workflow builder showcase
Understand how a workflow is designed: stages, checks, payment gates and the paperwork each stage produces
8-page PDF
This Field Guide
Look up any screen, button or term while you work
Searchable web guide
Your first hour
Sign in, then change your temporary password with the key icon at the top right (Getting there).
Searching. Type in the box at the top of this guide, or press / anywhere. Press Enter to open the first result.
Welcome. Nothing here bites.
Looking around changes nothing: every screen has its own Save button, and nothing is stored until you press it.
This guide is written for your first visit. Read the Start here pages in order (about five minutes), then jump to the tab you need. Every screenshot is from the live app, signed in as an Admin.
How to read the pictures
Purple numbered dots on a screenshot match the numbered notes underneath it. A purple outline means "look here". Click any screenshot to enlarge it.
Who is Alex Morgan? Nobody. People named in the pictures are fictional, and account IDs and mailbox addresses are blurred. Records labelled SYNTHETIC or MVP-TRIAL are test data that ships with the workspace.
Three promises the page keeps
Nothing saves by accident. Every tab has its own Save button. Until you press it, nothing is stored.
Old work is safe. Removing a list value, service or template stops it being offered for new work. Existing projects keep what they already had.
The page tells you its limits. Small grey notes under each panel say what a button does not do. Believe them.
Getting there
There are two doors into Settings, and both open the same page.
The side menu. Look at the bottom of the left-hand menu, under the Setup heading, and click Settings.
The sliders icon. In the top-right corner, next to your name, click the icon that looks like two mixing-desk sliders.
Dot
Icon
What it does
1
Bell
Opens your reminders
2
Sliders
Opens Settings (you want this one)
3
Key
Changes your own password
4
Door with arrow
Signs you out
The screenshots in this guide were taken as an Admin. The workspace limits what each role can see, so if Settings is missing from your menu, ask an Admin rather than hunting for it.
The lay of the land
Every Settings tab uses the same frame: menu on the left, tabs across the top, and the work happening underneath. Learn this picture once and the other nine tabs will feel familiar.
Side menu. Settings stays highlighted here so you always know where you are.
Breadcrumb and title. The "You are here" trail reads Setup, then Settings.
Tab strip. Ten tabs. The tall purple one is the tab you are on.
Work area. This part changes with each tab. Most tabs show a list on the left.
Detail panel. Click any row in a list and its details appear on the right.
Password recovery. A workspace-wide switch that lives outside the tabs. See its page.
Ten tabs is a lot to hold in your head, so think of them as four families.
If you are setting up from scratch, work left to right: the menu first, then the playbook, then the paperwork. The plumbing is usually set once by an Admin and then left alone.
Your first project, step by step
Create a project, put it on a workflow, and take it through the first stage. This is where you see a workflow guiding real work.
In the trial you can skip step 1: project MVP-TRIAL-260031 is already created and on the DA workflow. Start at step 3.
Leave the template on None, look up the property address, and choose the service type, for example DA preparation, lodgment and management.
Add the client's name and email, tick the staff who will work on it, and press Save project. A six-digit reference is allocated.
2. Put it on a workflow
Open the project. On the Overview tab, under Project process, choose the published workflow for the service and press Review and start process. Until you do, the Overview says This project has no governing Process Blueprint.
3. See what the workflow asks for
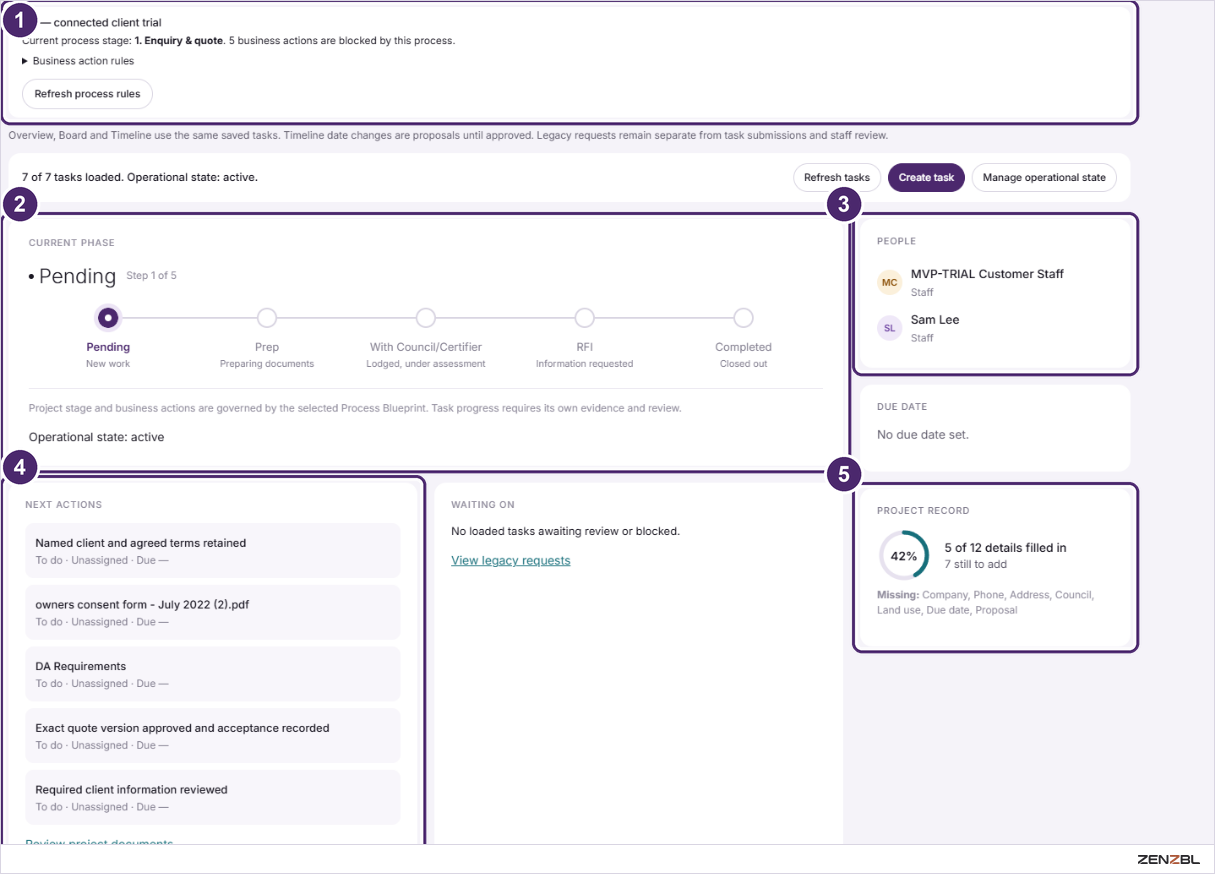
The governing workflow. Its name, the current stage (1. Enquiry & quote) and how many business actions it is blocking until the stage is complete. Open Business action rules to see which.
Current phase. The project's status, here Pending, set by the workflow.
People. The staff assigned.
Next actions. The stage's checks and the paperwork it can produce, such as the owner's consent form and the DA Requirements email.
Project record. Details still to fill in.
4. Complete stage 1
Gather information. On the Information tab, create an information request and review the answers.
Confirm the basics. Record the checks for client, property and scope, and for the client information reviewed.
Quote. On Commercial, prepare the quote, approve that exact version and publish it to the client, who accepts it in their own account.
Record the terms. Record the named client and the agreed terms.
Move on. When every check is ticked, the project can move to the next stage, Payment & clearance.
Good to know: the workflow, not the person, decides what is allowed at each stage. If a button is missing or refused, check Business action rules on the Overview: the stage probably does not allow it yet. To see how workflows are designed, read Process Blueprint in depth.
The Projects screen
Projects is the first screen you see after signing in. The top half tells you how the workload looks; the bottom half is the list you work from.
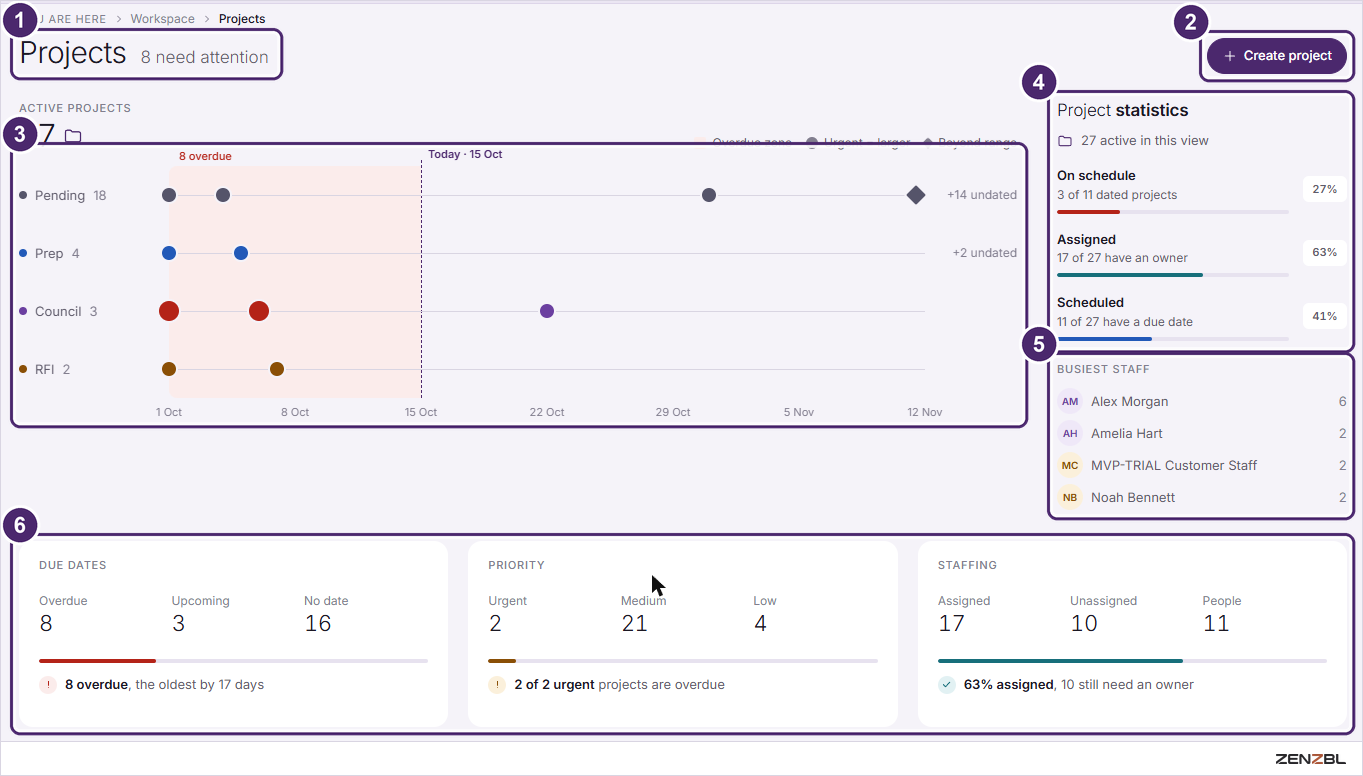
Title and alert. The grey words beside the title count projects that need attention, here 8.
Active projects chart. One row per stage, one dot per project, placed by due date. Dots in the pink zone left of the Today line are overdue. A bigger dot is an urgent project, a diamond is due beyond the dates shown, and +12 undated counts projects with no due date.
Project statistics. Three health bars: how many dated projects are on schedule, how many have an owner, and how many have a due date at all.
Busiest staff. Who is carrying the most projects.
Summary cards. The same workload counted three ways: by due date, by priority and by staffing. The line under each card states the headline in words.
Snappy’s tipLost a project? Finished ones are hidden. Switch the status filter to All statuses.
Below the cards is the project list.
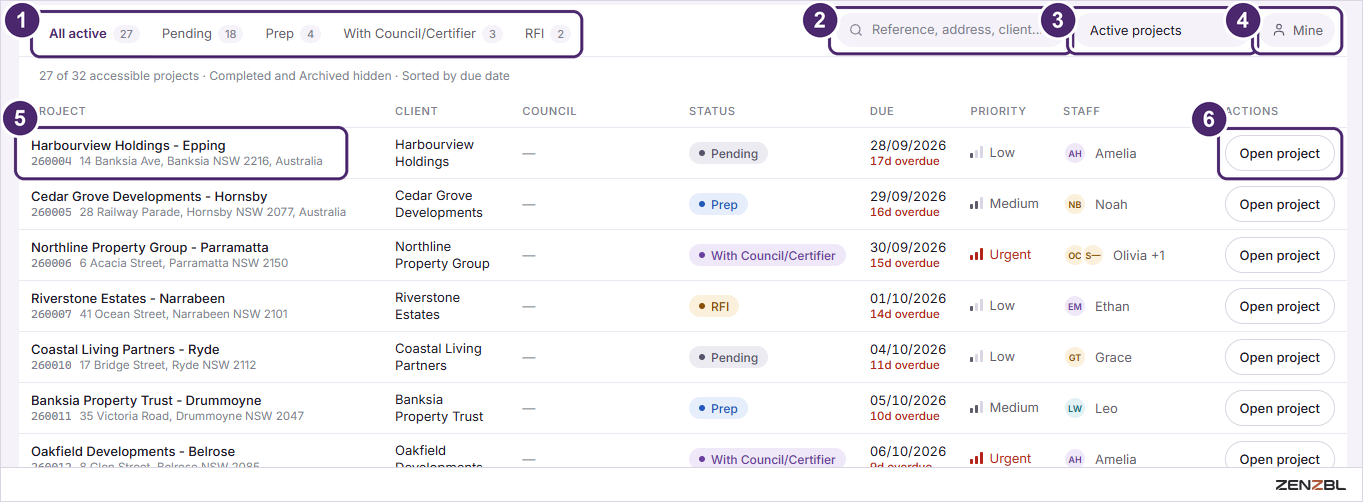
Stage tabs. Show every active project, or only those at one stage. The number is how many.
Search. Type a reference, an address or a client name.
Status filter. Starts on Active projects. Open it to see all statuses, a single stage, or Completed and Archived projects, which are hidden otherwise.
Mine. Narrows the list to your own projects.
A project. The name in bold, then its six-digit reference and address in small print.
Open project. Opens the project's own page.
Good to know: the grey line above the column headings tells you exactly what you are looking at, for example 24 of 28 accessible projects · Completed and Archived hidden · Sorted by due date. You only ever see projects your role and assignments allow.
Find and open a project
Three ways in, depending on what you already know.
You know
Do this
The reference, address or client
Type it into Find a project at the very top of the screen, or into the search box above the project list
Roughly what stage it is at
Click that stage's tab above the list, then scan the rows
Only that it is yours
Press Mine to hide everyone else's projects
Then press Open project at the end of its row.
Reading a row
Column
What it tells you
Project
Name, six-digit reference and property address
Client
The client on the project, or No linked client
Council
The council area, or a dash if it has not been set
Status
The project's stage as a coloured pill
Due
The due date, with 16d overdue or in 17d beneath it
Priority
Low, Medium or Urgent
Staff
Who is assigned. +1 means one more person than shown
Cannot find it? Finished work is hidden by default. Change the status filter from Active projects to Completed, Archived or All statuses.
Create a project
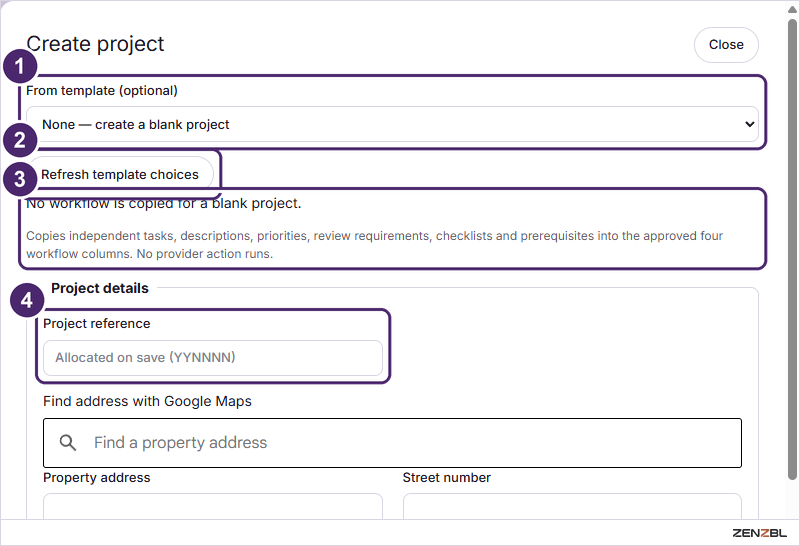
Press Create project at the top right of the Projects screen. One form opens. You can start small and fill in the rest later.
From template (optional). Leave it on None for a blank project, or pick a template to start with a ready-made set of tasks.
Refresh template choices. Reloads the list if a template was added a moment ago.
What a template brings. Its tasks, descriptions, priorities, checklists and prerequisites are copied in. Nothing is sent or run.
Project reference. Leave it empty. The six-digit reference is allocated when you save.
The rest of the form is the same one you use to edit a project, in four blocks. The Edit a project page shows every block.
Project details. Start typing in Find a property address and pick the match; the address fields fill themselves in. Add a description, a priority and a due date if you have them.
Client details. Name, email, company, phone and notes.
Project register. Council area, land use, the service types being provided, and free-text boxes for the proposal and any notes.
Staff assigned. Tick everyone who should work on it.
Press Save project at the bottom.
About the name: if you leave Project name blank, the project is named from its reference and address. A name is only required when there is no address.
Good to know: typing a client's details here does not give that client a login. Inviting people to the workspace is a separate step. Assigning a staff member, on the other hand, does give them access to the project.
Edit a project
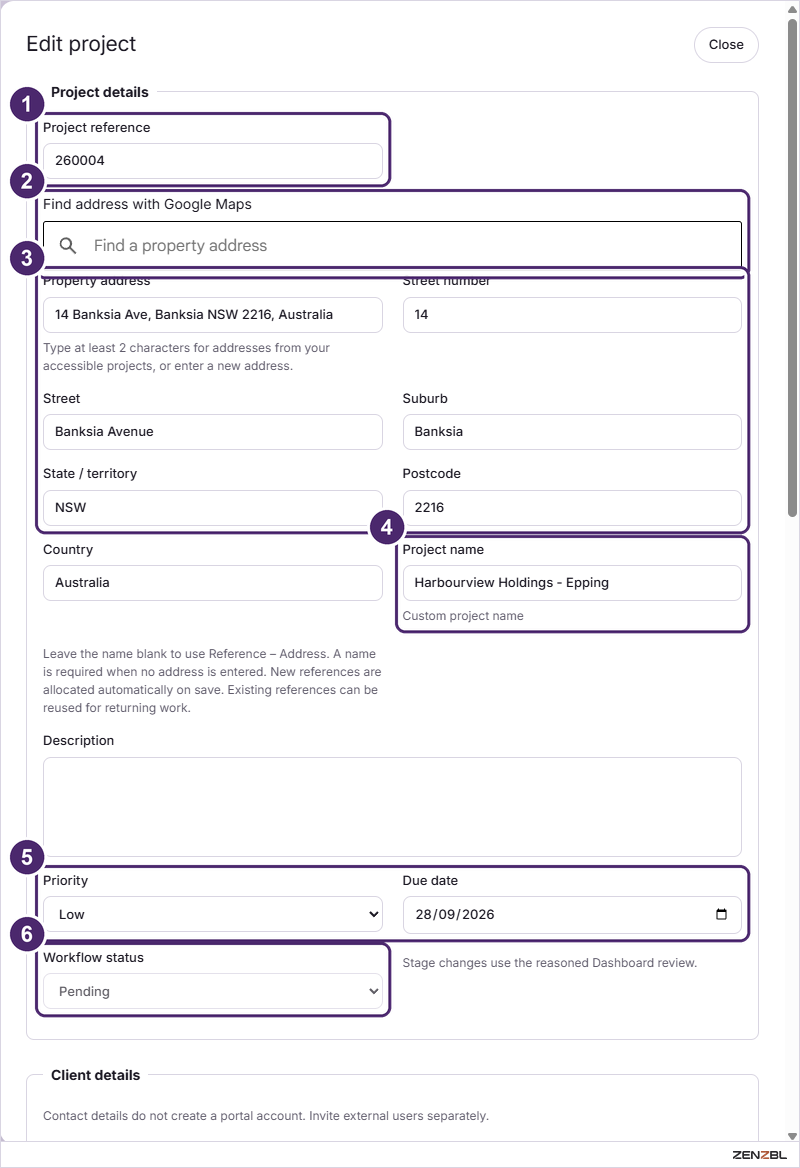
Open the project and press Edit project at the top right. The form has four blocks; scroll inside it to reach them all.
Project details
Project reference. The six-digit number allocated when the project was created.
Find address with Google Maps. Type a few characters and choose the property. It fills in the fields below.
Address fields. Correct any part by hand if the lookup was not quite right.
Project name. A custom name, or blank to use the reference and address.
Priority and due date. The priority choices come from Settings, Lists.
Workflow status. Shown but greyed out. A project's stage is not changed here; stage changes go through a review with a reason.
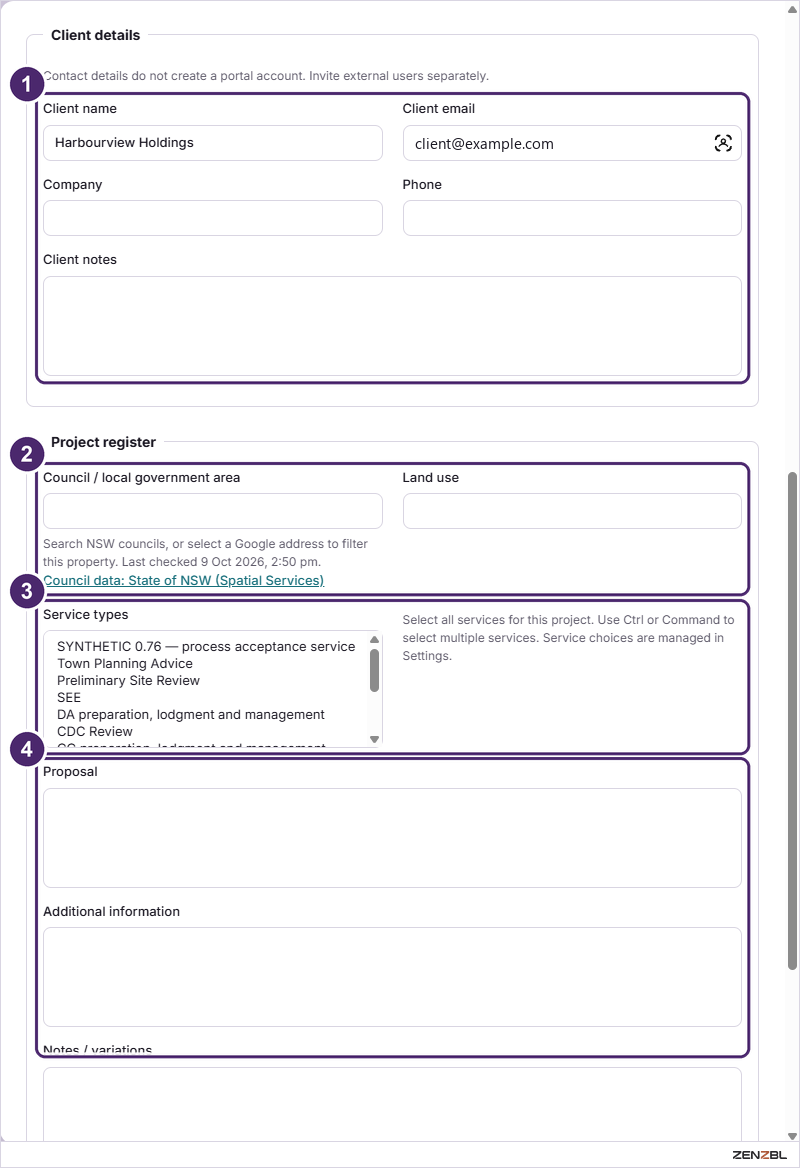
Client details and project register
Client details. Name, email, company, phone and notes for the client.
Council and land use. Start typing to search councils. Choosing a Google address above narrows the council for you.
Service types. Click one, or hold Ctrl (Command on a Mac) and click to choose several. The choices come from Settings, Services.
Proposal, additional information, notes. Free-text boxes for what the job is and anything that changes along the way.
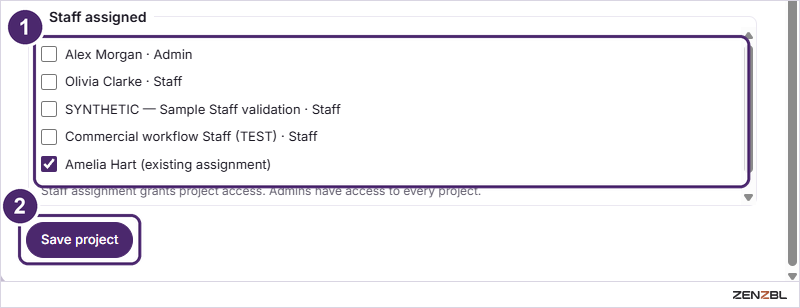
Staff and saving
Staff assigned. Tick or untick people. Someone already on the project is marked existing assignment.
Save project. Stores your changes. Close at the top of the form leaves without saving.
Good to know: the summary strip on the project page says Captured at project creation under the client. The original contact details are kept as a record.
The project page
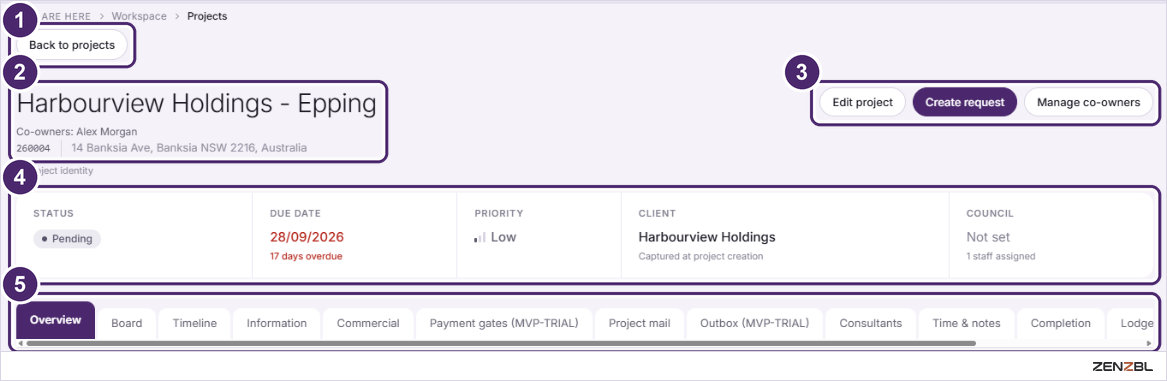
Every project opens on the same page: a header, and thirteen tabs underneath it.
Back to projects. Returns to the list.
Reference and name. With the co-owners and the property address beneath.
Action buttons.Edit project opens the edit form. Create request starts an information request. Manage co-owners changes who shares ownership of the project.
Summary strip. Status, due date, priority, client and council at a glance. An overdue date turns red.
The tabs. Thirteen of them, in two rows. The purple one is the tab you are on.
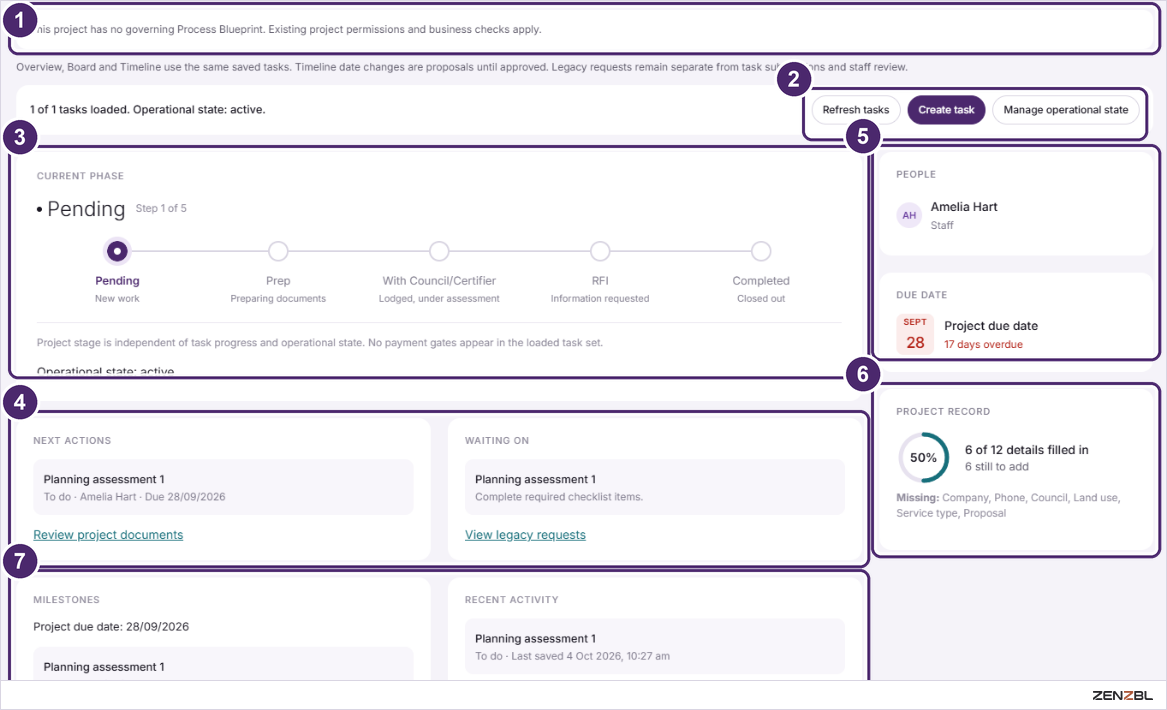
The project on one screen: where it is, what happens next, and what is missing.
Process banner. Says which workflow governs the project, or that none does yet. See Your first project.
Task buttons.Refresh tasks reloads them, Create task adds one, and Manage operational state changes the project's operational state, shown here as active.
Current phase. The five stages as a row of circles, with the current one filled in.
Next actions and Waiting on. The task to do next, and what is holding things up.
People and due date. Who is on the project and when it is due.
Project record. How complete the project's details are, with the missing ones listed. Fill them in with Edit project.
Milestones and recent activity. Upcoming dates and the latest saved changes.
Further down the tab
Your project access. A plain statement of what you are allowed to do on this project.
Project process. Choose a published Process Blueprint version and press Review and start process to put this project on a defined path of stages and conditions.
Project details. The linked client and the contact details captured when the project was created.
Good to know: the stage shown here is separate from task progress. The page says so itself: project stage is independent of task progress.
Board tab
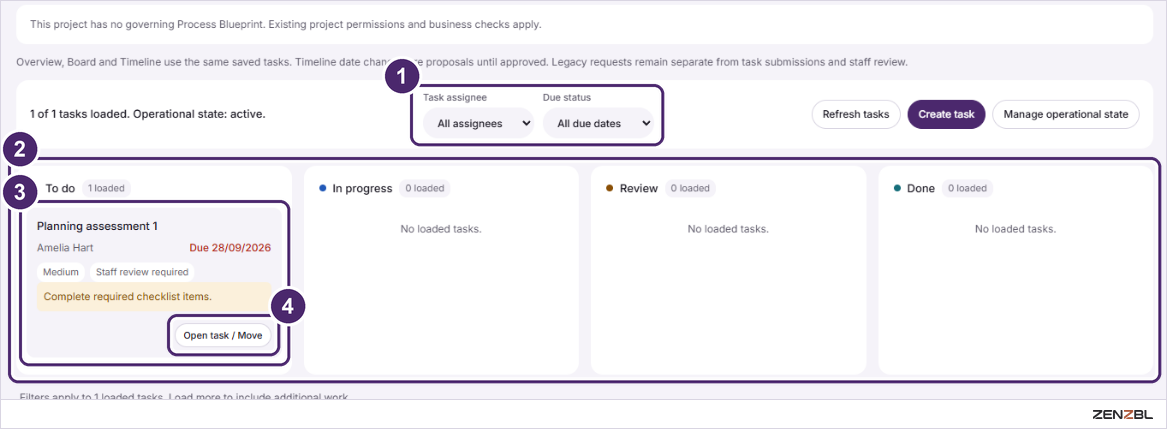
The project's tasks as cards in four columns: To do, In progress, Review and Done.
Filters. Show one person's tasks, or only tasks with a certain due status.
The four columns. Each heading counts the tasks loaded in it.
A task card. The task's name, who has it, its priority and due date. An amber note says what is stopping it, here an unfinished checklist.
Open task / Move. Opens the task to work on it or to move it to another column.
Good to know: Overview, Board and Timeline all read the same saved tasks, so they never disagree.
Timeline tab
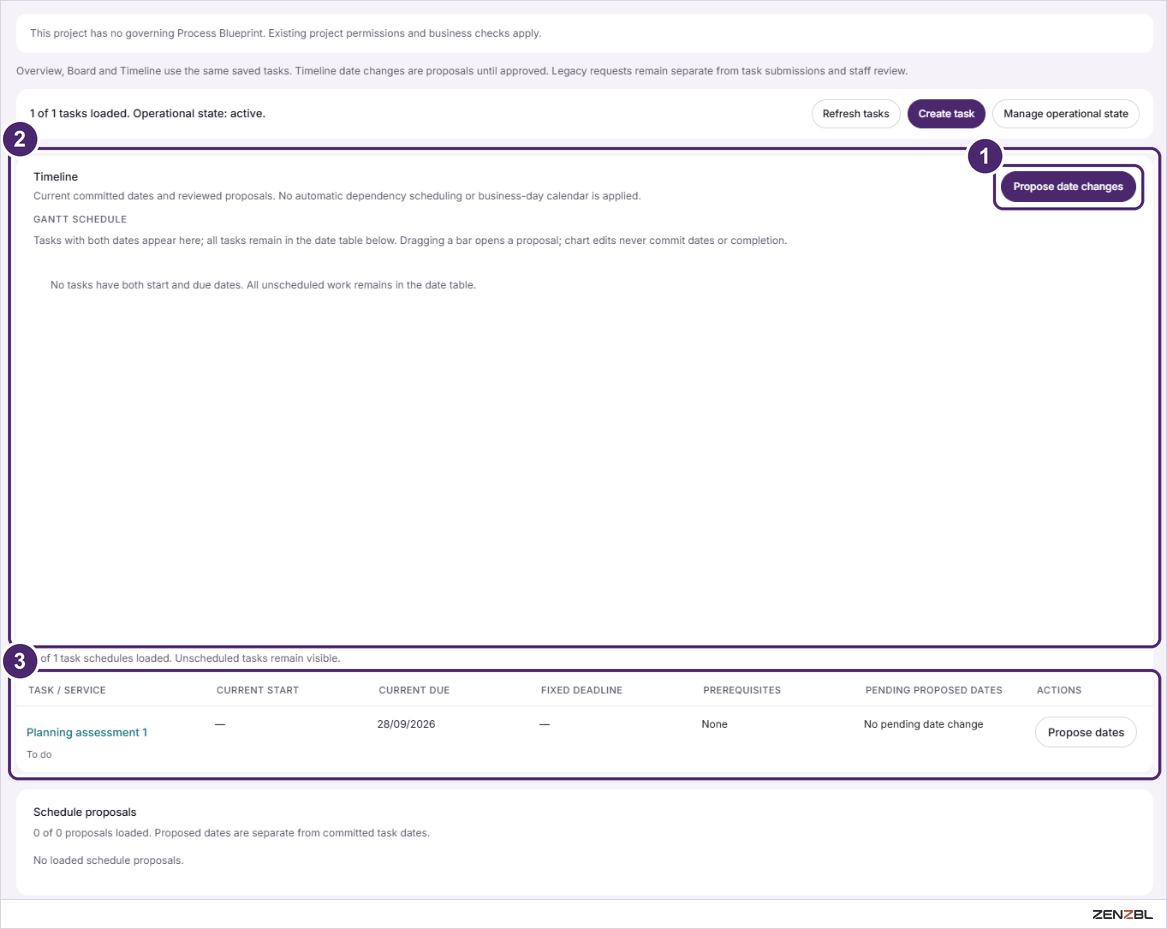
The same tasks laid out by date, as a Gantt chart with a date table beneath it.
Propose date changes. Dates are not edited directly. You propose a change, and it takes effect once it is approved.
Gantt schedule. A bar appears for every task that has both a start date and a due date. This project's one task has only a due date, so the chart is empty.
Date table. Every task, dated or not, with Propose dates beside each.
Below the chart, the date table lists every task, dated or not, with its current start and due dates, any fixed deadline, its prerequisites and any proposed change still waiting for approval.
Good to know: the timeline does not reschedule anything for you. There is no automatic knock-on scheduling and no business-day calendar.
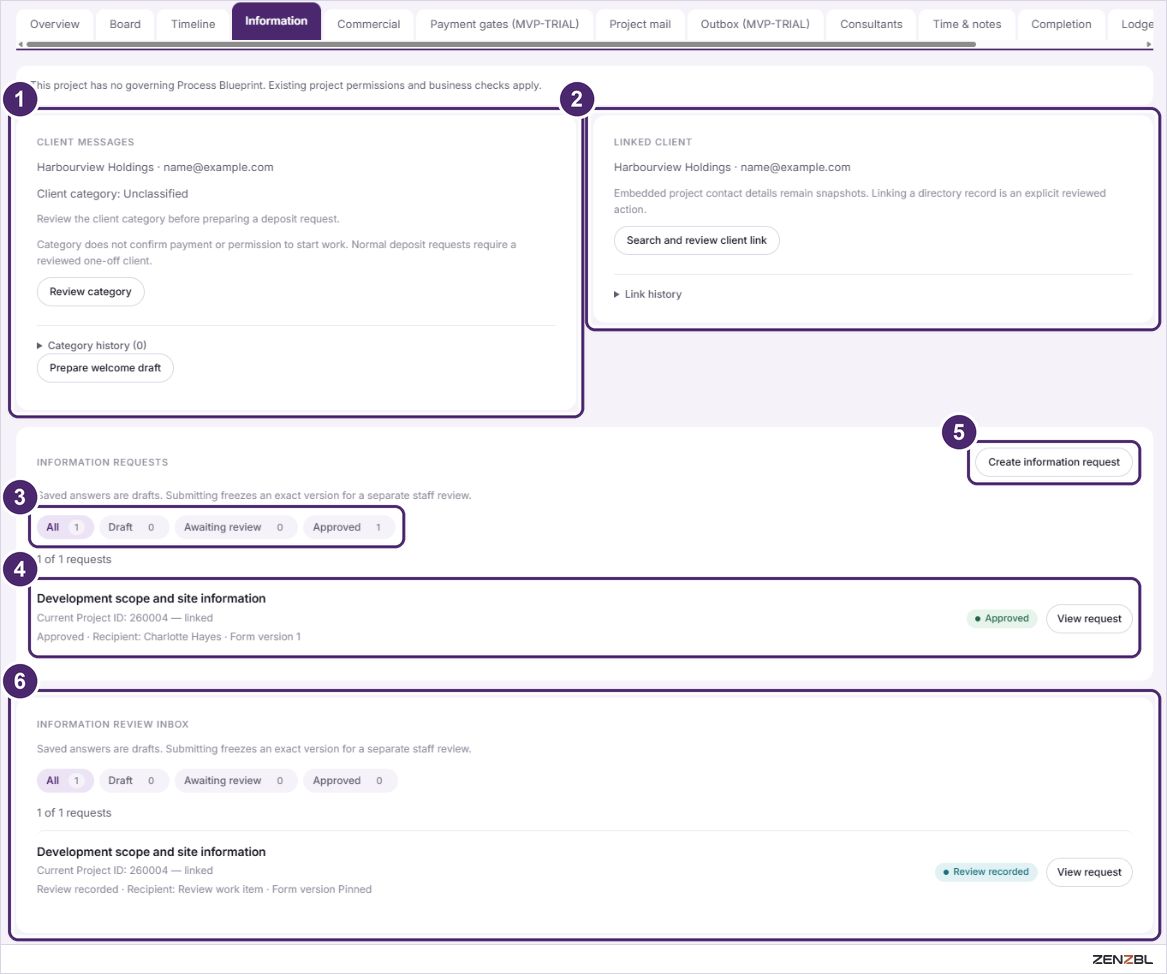
Information tab
Everything about getting details from the client: who they are, what you have asked them, and what they have answered.
Client messages. The client's category, with Review category to set it and Prepare welcome draft to draft a welcome message.
Linked client. The client record this project is tied to. Search and review client link connects it to a record in the directory.
Request filters. All, Draft, Awaiting review and Approved.
A request. Its title, who it went to and its state. View request opens it.
Create information request. Starts a new request for the client to answer.
Information review inbox. Submitted answers waiting for, or already given, a staff review.
Good to know: saved answers are drafts. Submitting freezes that exact version, which then waits for a separate staff review.
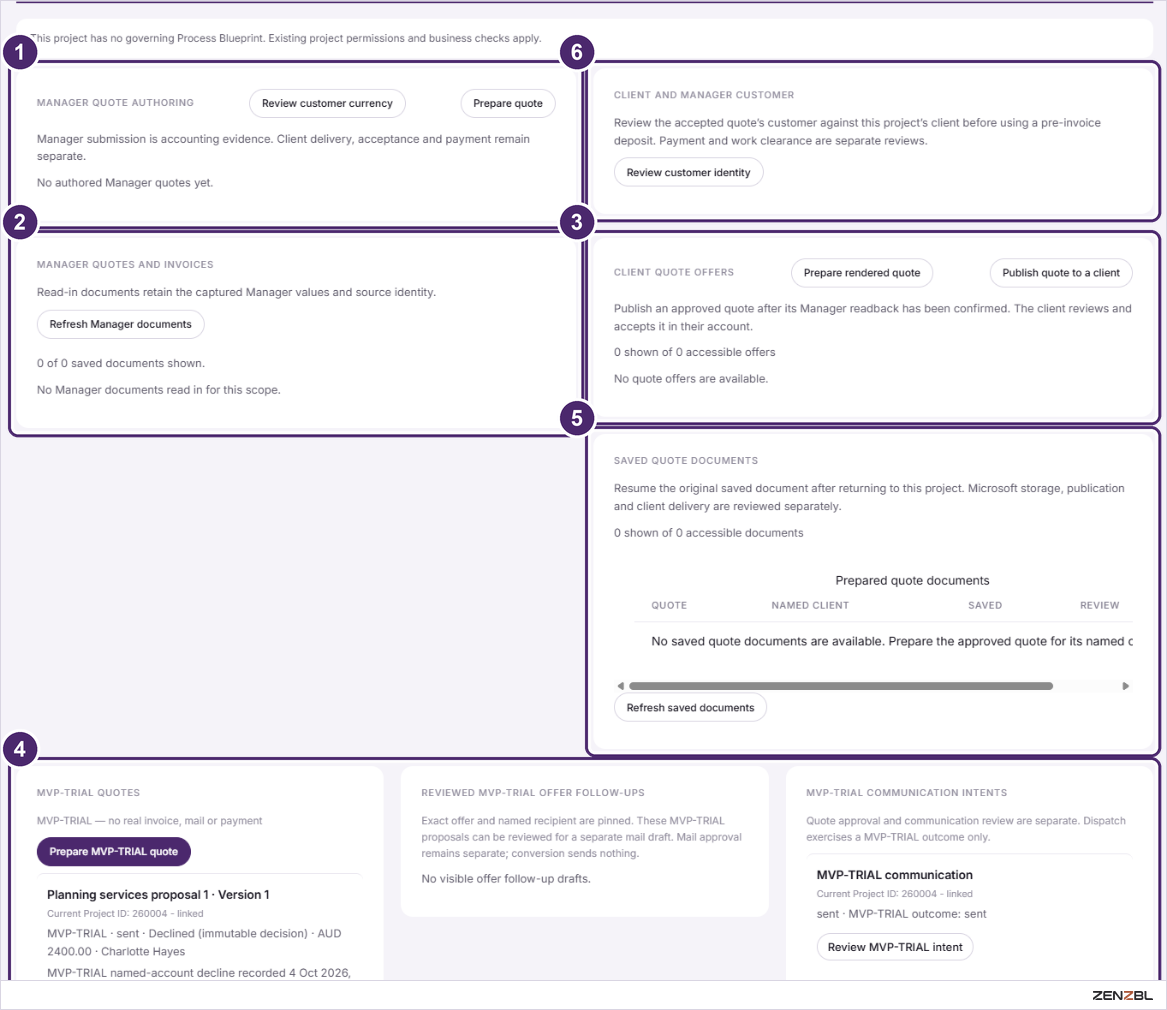
Commercial tab
Quotes and invoices for this project. Manager here means the accounting system.
Manager quote authoring.Prepare quote starts a quote. Review customer currency checks the currency first.
Manager quotes and invoices. Documents read in from accounting. Refresh Manager documents fetches the latest.
Client quote offers.Prepare rendered quote builds the document; Publish quote to a client puts the approved quote in front of the client, who reviews and accepts it in their own account.
MVP-TRIAL quotes. Practice quotes. No real invoice, email or payment is involved.
Saved quote documents. The prepared quote documents, saved before they are published.
Client and Manager customer.Review customer identity checks the accounting customer matches the project's client.
Good to know: the tab keeps each step separate. Recording a quote in accounting, delivering it to the client, the client accepting it, and payment are different things, and one is never assumed from another.
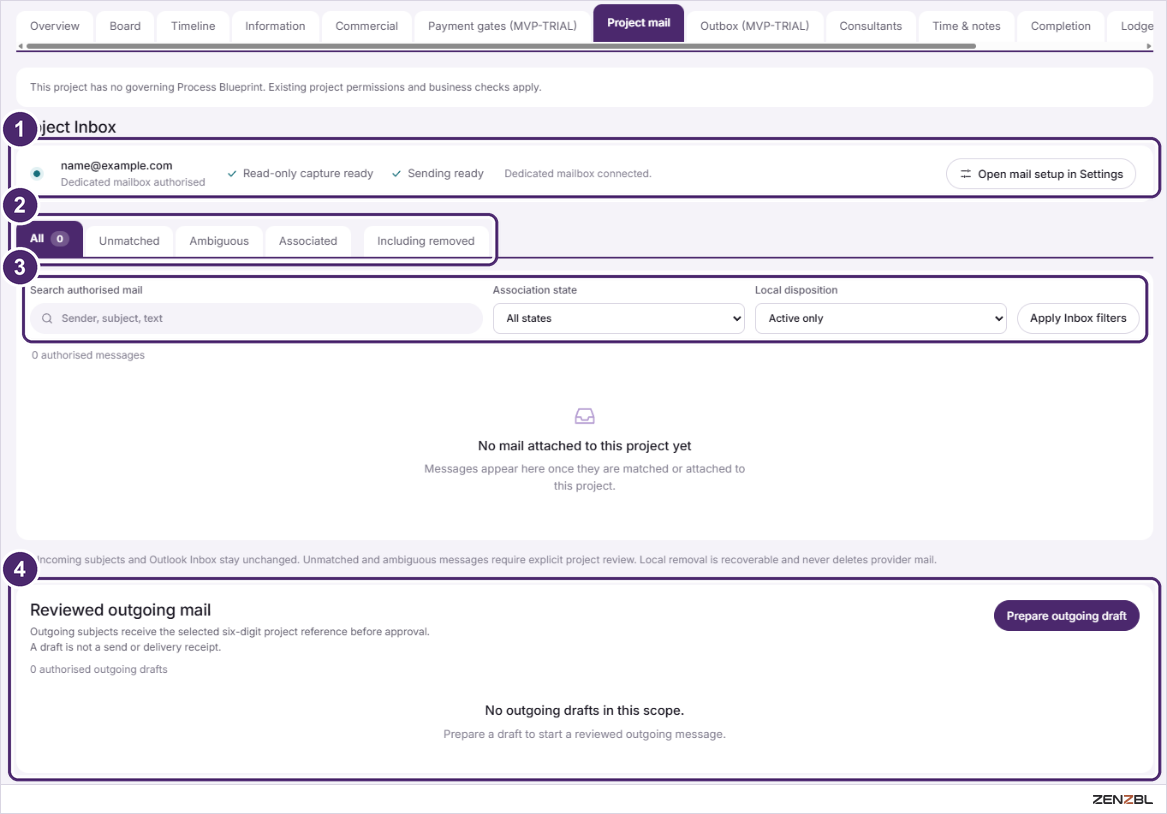
Project mail tab
Email that belongs to this project, in and out.
Mailbox status. Confirms the workspace mailbox is connected and ready.
Inbox filters.Associated messages are filed to this project. Unmatched and Ambiguous ones need a person to decide where they belong.
Search and filters. Narrow the messages, then press Apply Inbox filters.
Reviewed outgoing mail.Prepare outgoing draft starts an email. The project's six-digit reference is added to the subject before approval.
Good to know: a draft is not a sent email. Removing a message here is recoverable and never deletes anything from the real mailbox.
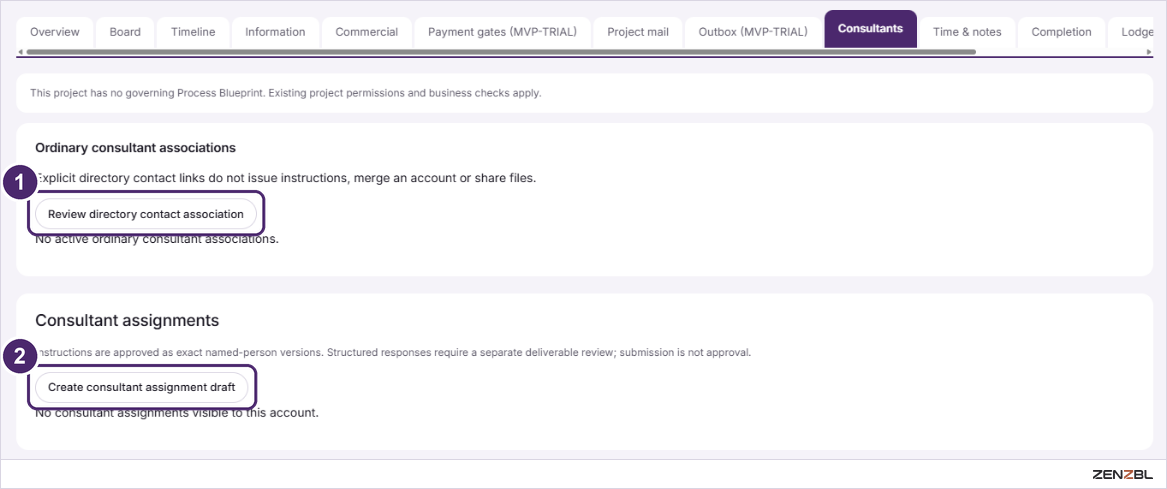
Consultants tab
Outside specialists who contribute to the project.
Review directory contact association. Links a consultant from your contact directory to this project. Linking alone issues no instructions and shares no files.
Create consultant assignment draft. Drafts instructions for a named consultant.
Good to know: a consultant submitting work is not the same as that work being approved. Their response gets its own review.
Time & notes tab
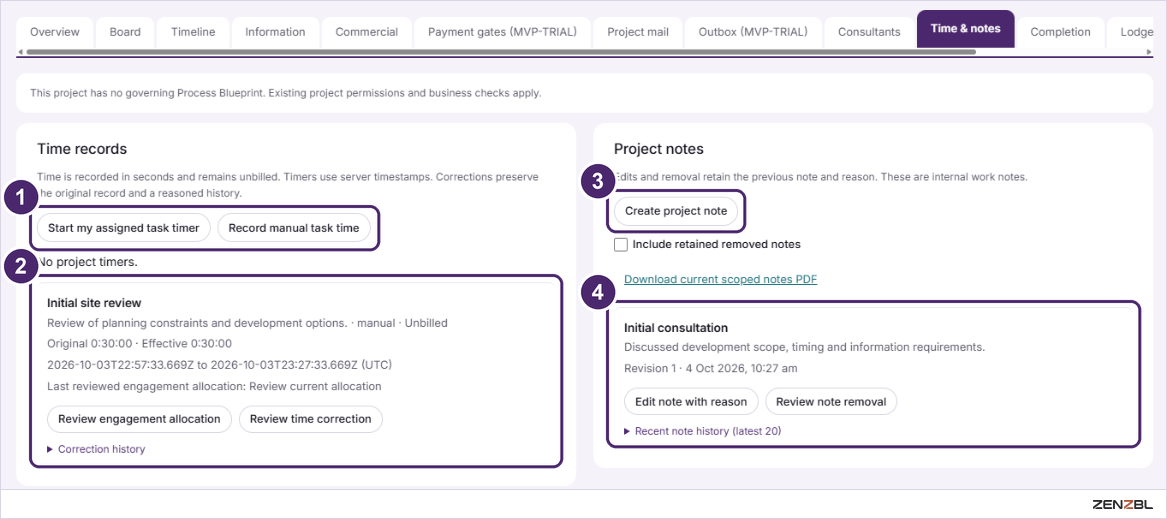
The project's logbook: time spent and internal notes.
Timer buttons.Start my assigned task timer runs a clock on your task. Record manual task time adds time after the fact.
A time record. What was done, how long it took, and that it is unbilled.
Create project note. Adds an internal note. Download current scoped notes PDF beneath it exports them.
A note. With its revision number and date. Edit note with reason changes it.
Good to know: nothing here is silently overwritten. Correcting a time record or editing a note keeps the original and asks for a reason. These are internal work notes.
Completion tab
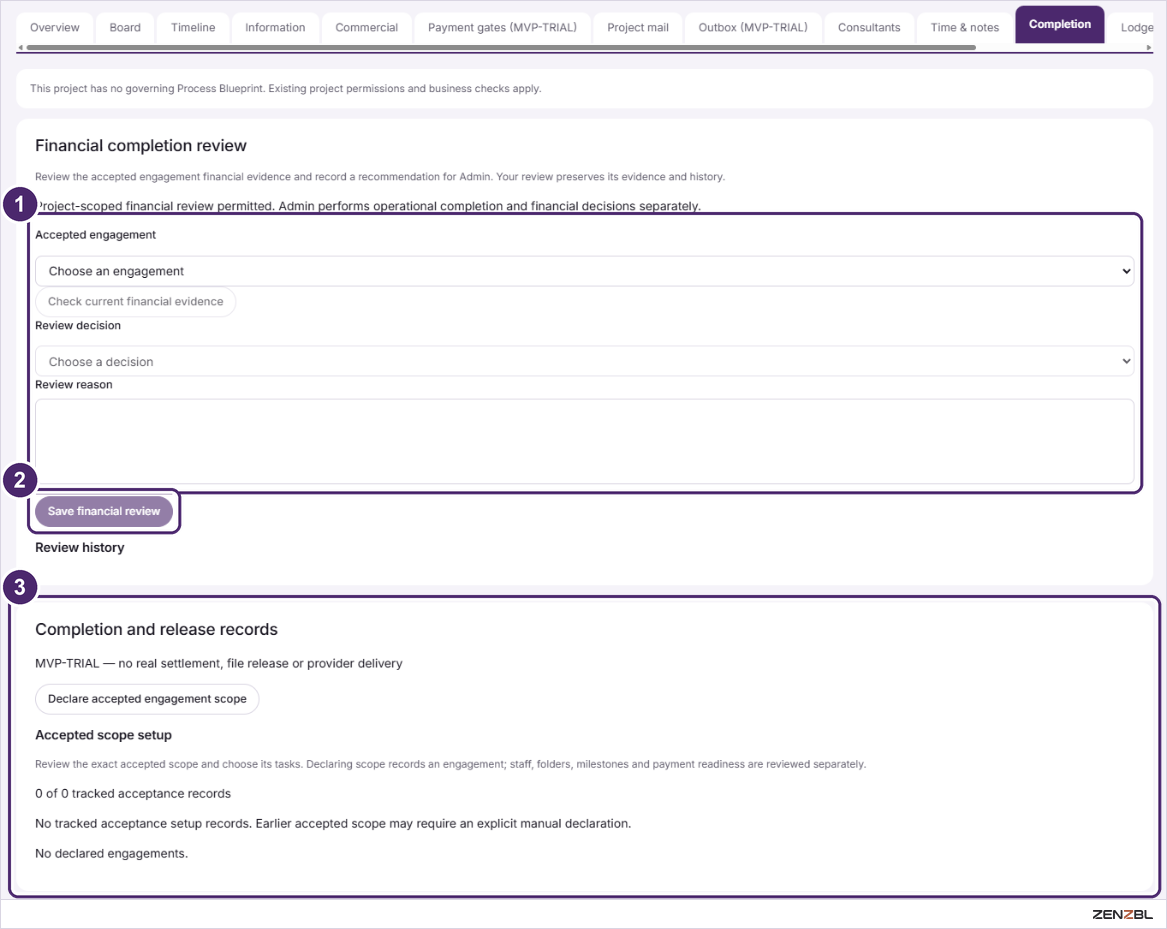
The financial check made before a project is closed out.
The review form. Choose the accepted engagement, press Check current financial evidence, pick a decision and give a reason.
Save financial review. Records your recommendation. Earlier reviews are listed under Review history.
Completion and release records. Marked SYNTHETIC: practice records only.
Good to know: your review is a recommendation. An Admin makes the completion and financial decisions separately.
Lodgement & RFI tab
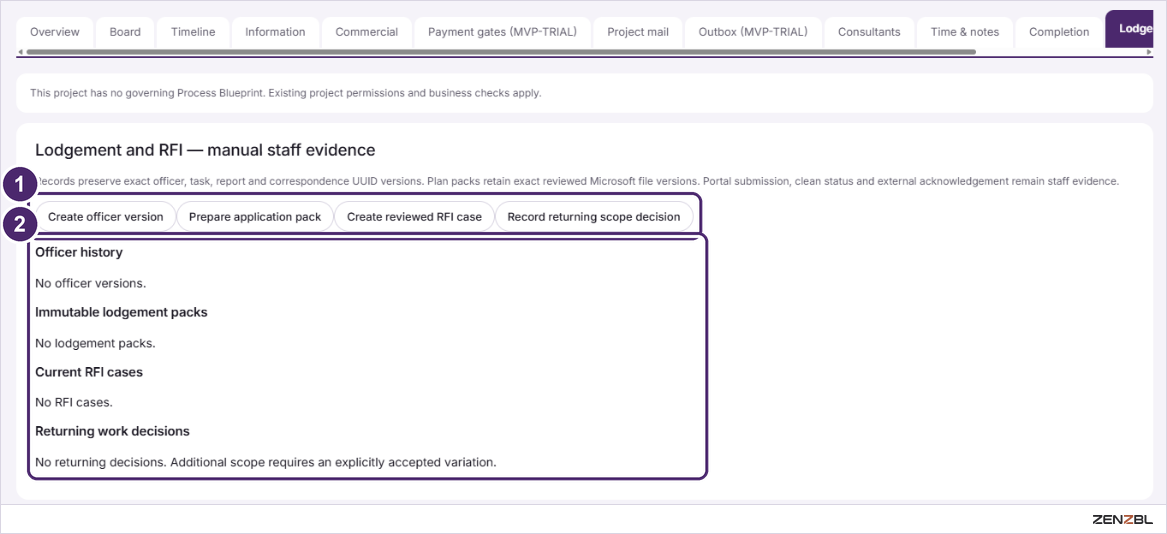
A record of dealings with the council: the assessing officer, what was lodged, and any requests for information (RFIs) that came back.
Four actions.Create officer version, Prepare application pack, Create reviewed RFI case and Record returning scope decision.
Four histories. Officers, lodgement packs, RFI cases and returning-work decisions, each empty until something is recorded.
Good to know: the tab is headed manual staff evidence. Lodging on the council's portal is done by a person; this tab keeps the record of it.
Billing checkpoints and the two test tabs
Three tabs most people rarely open.
Tab
What it holds
Do you need it?
Billing checkpoints
Progress billing review items. Choose an accepted engagement and press Prepare billing review item
Only when reviewing what to bill. It does not create or send an invoice
Payment gates (MVP-TRIAL)
Practice payment gates and practice payment records
No. Nothing here is a real payment
Outbox (MVP-TRIAL)
Practice email drafts
No. Nothing here is really sent
Good to know: anything labelled synthetic is a rehearsal space. It never touches a real client, payment or mailbox.
The People & access screen
Everyone the workspace knows about, in four tabs: the clients you work for, your own team, outside consultants, and the accounts people sign in with.
Open it from People & access, second in the side menu.
Invite someone, change a role, switch an account off
The one idea to hold on to: being in the directory and being able to sign in are two different things. A client contact or a consultant only gets a login when someone creates an account for them in Accounts & access.
Clients & contacts
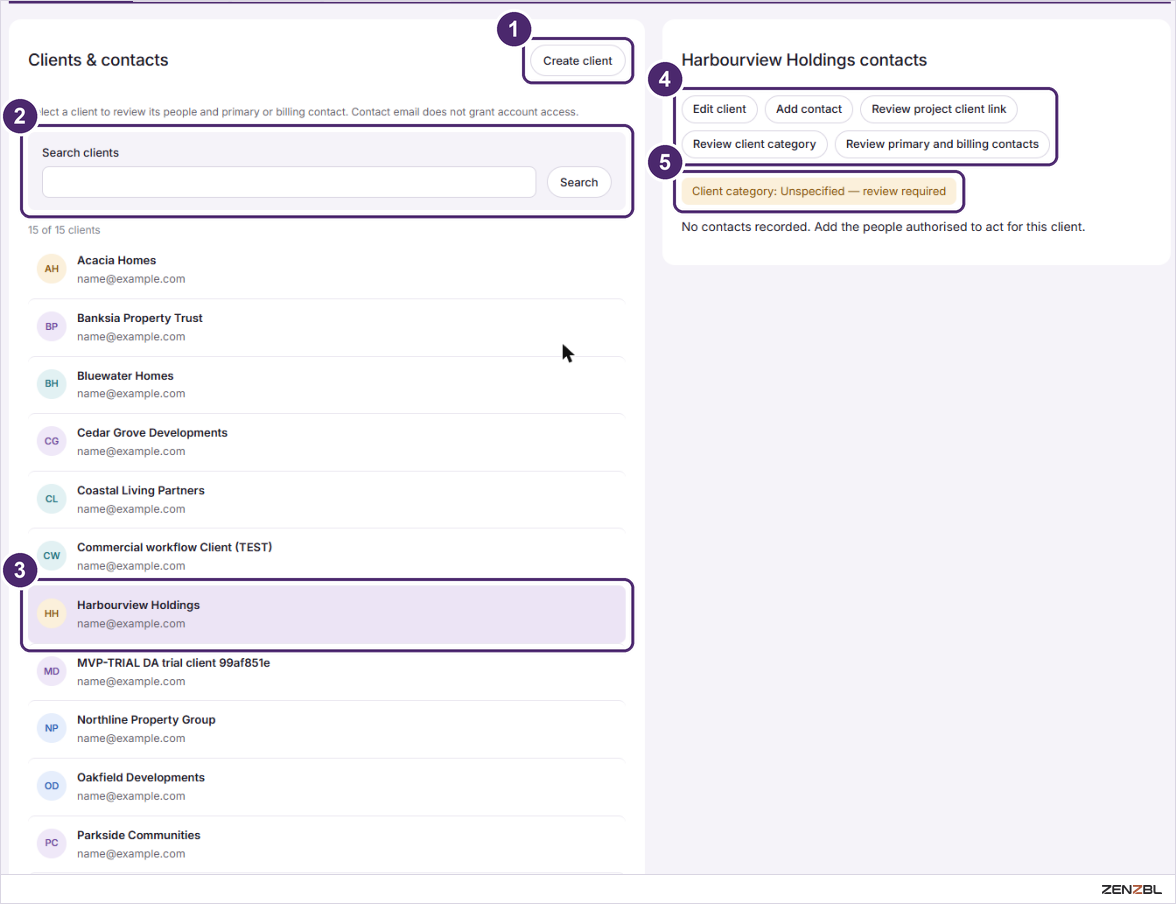
The client organisations you work for, and the people allowed to act for each one.
Create client. Adds a new client organisation.
Search clients. Type part of a name and press Search.
A client. Click one and it turns purple; its details open on the right.
Client actions.Edit client changes its details. Add contact records a person who acts for it. Review project client link ties the client to projects. Review client category and Review primary and billing contacts set who is the main and the billing contact.
Client category. An amber note when the category still needs reviewing.
Good to know: a contact's email address does not give them access to anything. To let a client contact sign in, add them as an external user in Accounts & access.
Internal staff
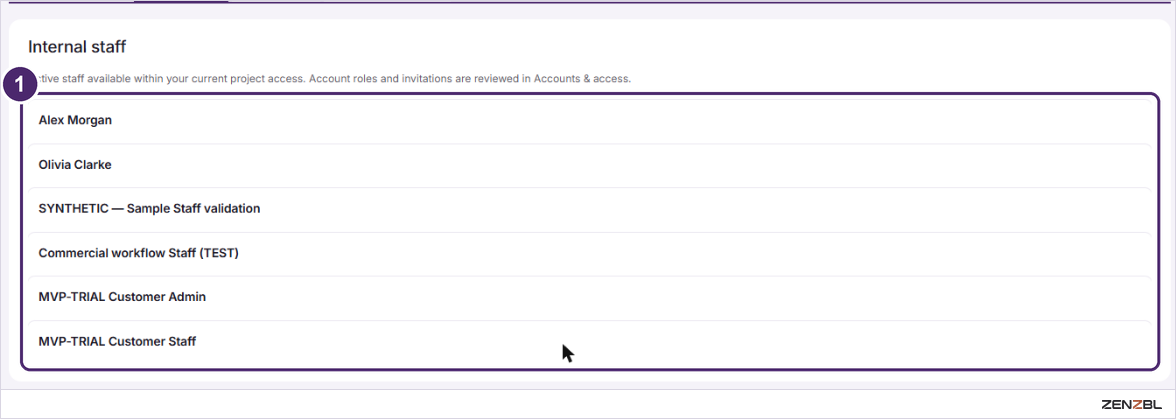
A simple list of the active members of your team.
The team. Active staff you can see within your own project access.
Good to know: nothing is edited here. Roles, project assignments and invitations are all handled in Accounts & access.
Consultants directory
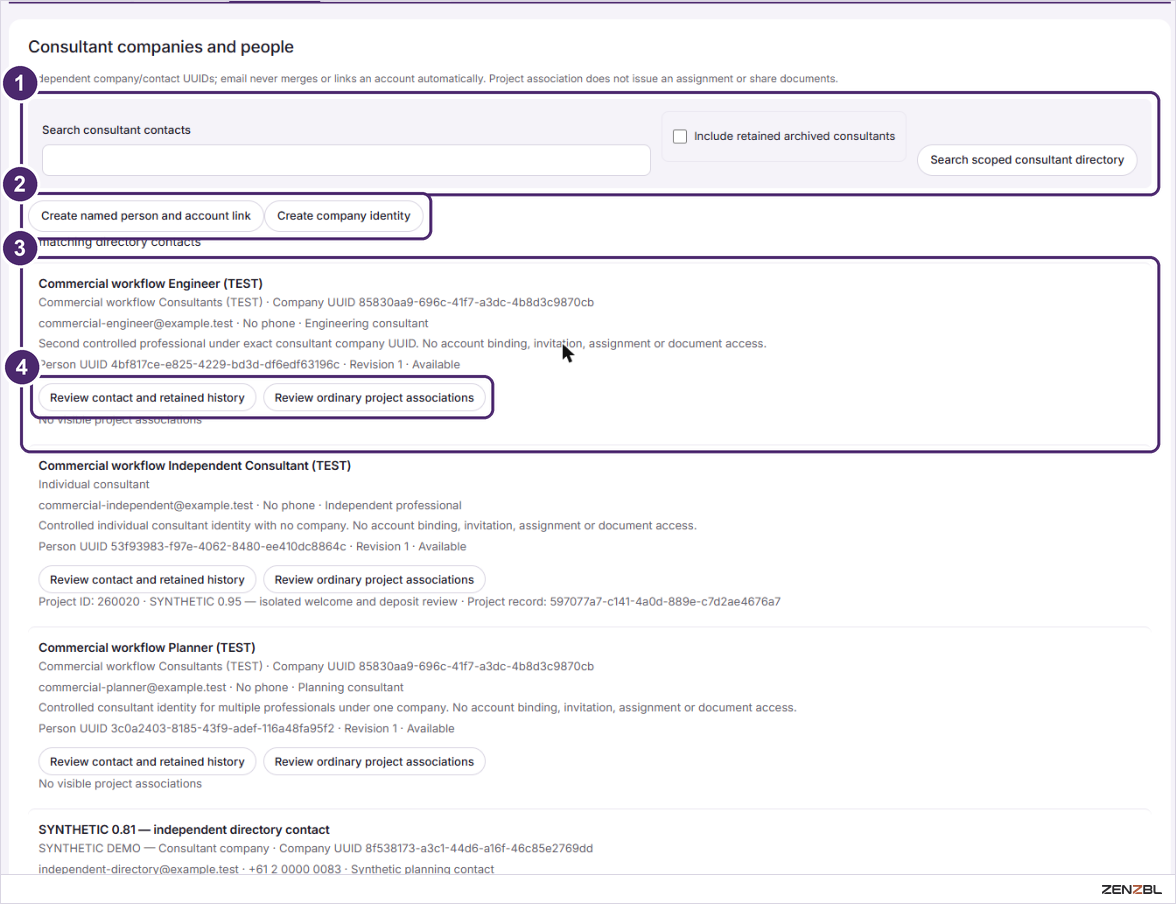
Outside consultant companies and the people who work for them, kept as a directory you can link to projects.
Search. Type a name, tick Include retained archived consultants if you want old entries too, then press Search scoped consultant directory.
Create buttons.Create company identity adds a consultant firm. Create named person and account link adds a person.
A consultant. Name, company, email, phone and speciality, with whether they are available.
Review buttons. One shows the contact's history; the other shows which projects they are associated with.
Good to know: each company and person is a separate record. A matching email never merges two entries or links an account automatically, and adding a consultant to a project neither sends them instructions nor shares documents. Instructions are drafted on the project's Consultants tab.
Accounts & access
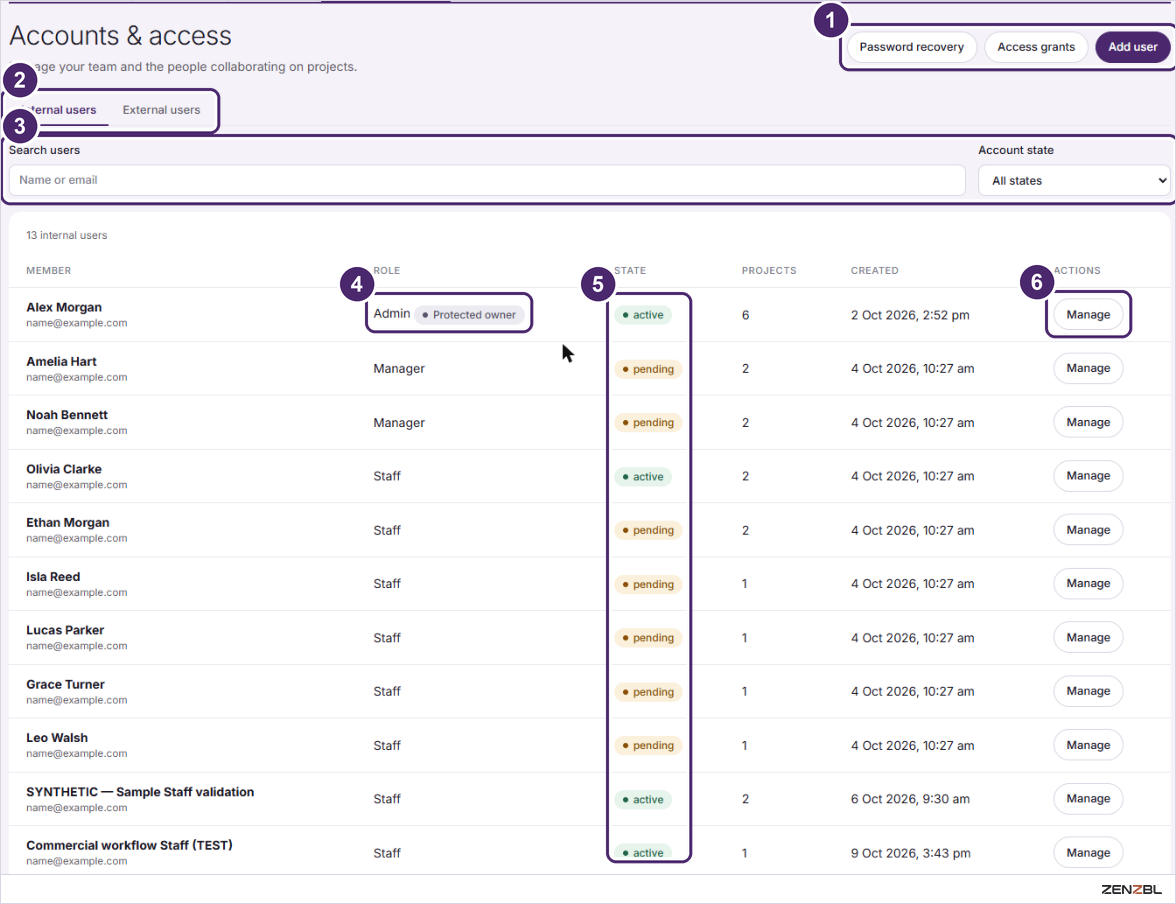
Everyone who can sign in to the workspace, their role, and the projects they can see.
External users, such as clients, appear on their own tab with the role External.
Good to know: the Projects column counts how many projects each person is assigned to. Admins can see every project whatever the count.
Add a user
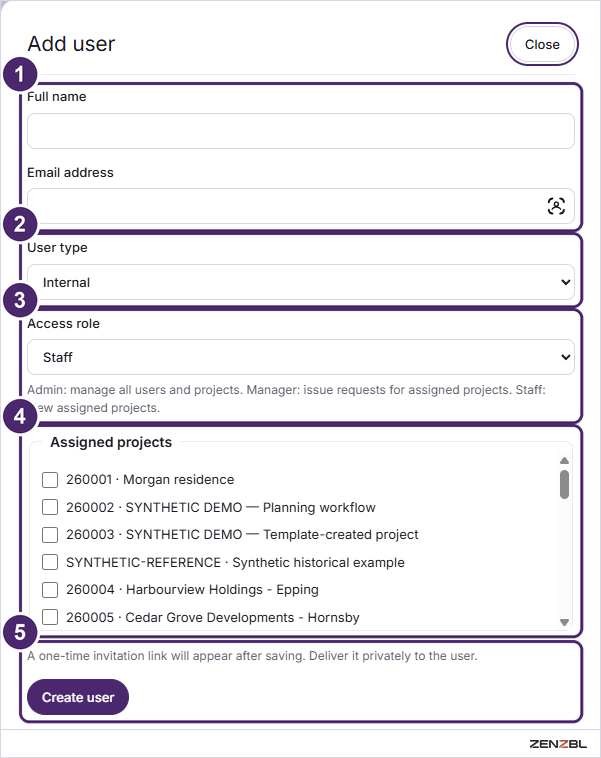
Press Add user in Accounts & access. The form slides in from the right.
Full name and email address. The email is how they will sign in.
User type.Internal for your team, External for a client or other outside person. This cannot be changed later.
Access role. Admin, Manager or Staff, with what each allows written underneath.
Assigned projects. Tick the projects this person should see.
Create user. Saves the account as pending.
Important: after saving, a one-time invitation link appears. Send it to the person yourself, privately. Their account becomes active only once they accept it.
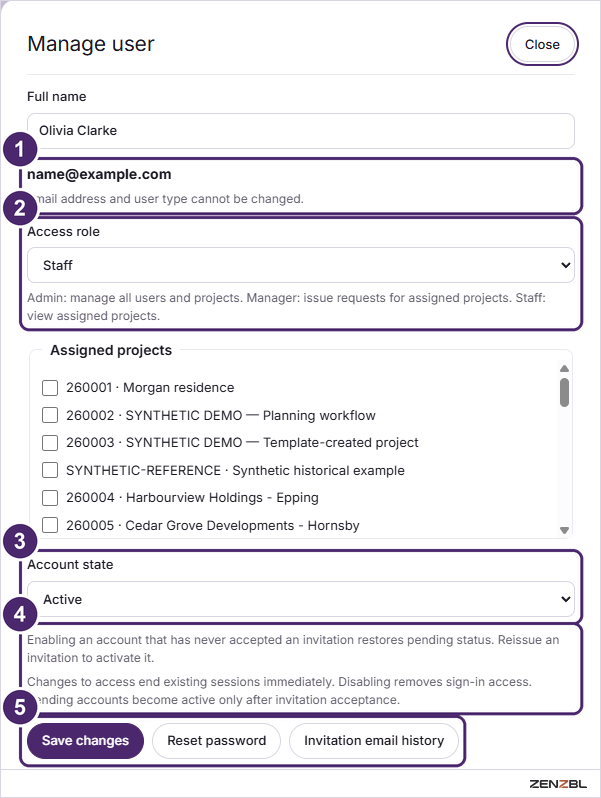
Manage a user
Press Manage beside anyone in Accounts & access.
Email address. Shown but fixed. Neither the email nor the user type can be changed.
Access role. Switch between Admin, Manager and Staff.
Account state.Active or Disabled. Disabling removes sign-in access.
The rules. Re-enabling an account that never accepted its invitation puts it back to pending; reissue the invitation to activate it.
Buttons.Save changes, Reset password, and Invitation email history to see what was sent.
Good to know: any change to someone's access signs them out everywhere straight away, so they pick up the new access on their next sign-in.
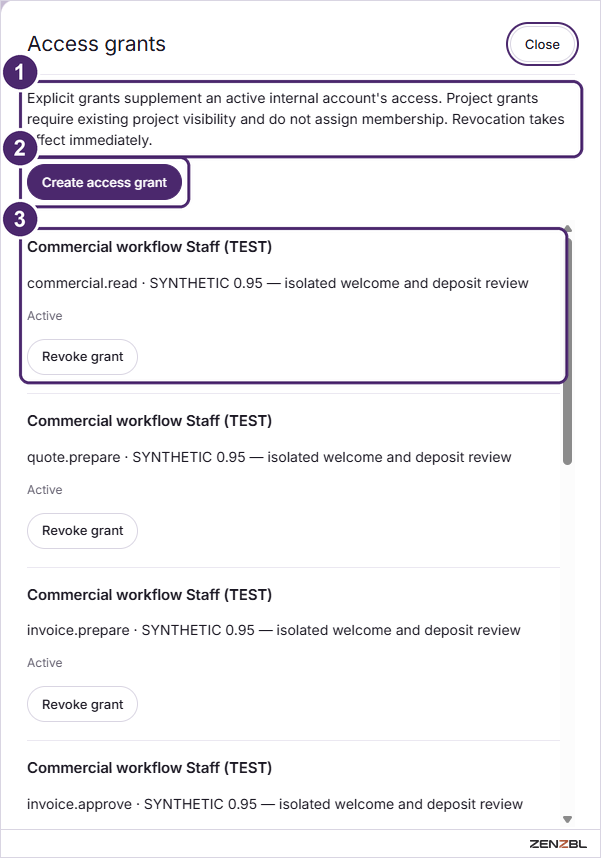
Access grants
Extra, specific permissions on top of someone's role, usually for money matters on one project. Press Access grants in Accounts & access.
The rules. Grants add to an active internal account's access. A project grant only works on a project the person can already see.
Create access grant. Adds one.
A grant. Who has it, which permission, on which project, and whether it is active. Revoke grant removes it at once.
Permissions you will see
Grant
Lets the person
commercial.read
See the project's commercial details
quote.prepare
Prepare quotes
invoice.prepare
Prepare invoices
invoice.approve
Approve invoices
deposit.assign
Assign deposits
completion.review
Carry out completion reviews
Good to know: a grant does not add someone to the project team. Assign them to the project first, then grant the extra permission.
My work & calendar
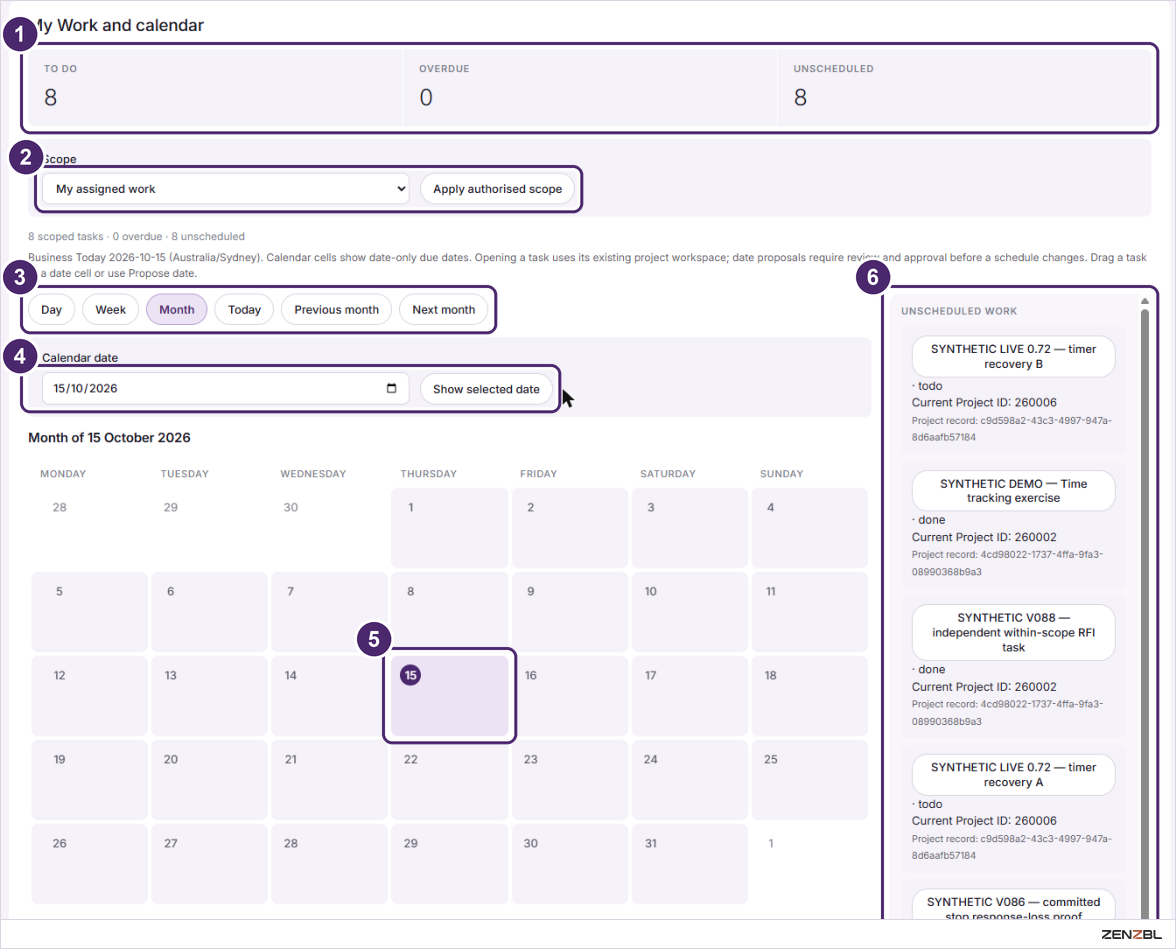
Your own tasks from every project, in one place, laid out on a calendar by due date. Open it from My work & calendar, third in the side menu.
Counts. How many tasks you have to do, how many are overdue, and how many have no date yet.
Scope.My assigned work shows tasks given to you. Team work where I manage the project shows everyone's tasks on projects you manage. Press Apply authorised scope after changing it.
View buttons. Day, Week or Month, Today to jump back, and Previous and Next to move through time.
Calendar date. Pick any date and press Show selected date.
Today. Highlighted in purple. Each day lists the tasks due on it, or No due work.
Unscheduled work. Tasks with no due date, each with its state and project. Click a task's name to open it in its project.
Giving a task a date
Drag a task from Unscheduled work onto a day, or use Propose date. Either way you are proposing a date: it changes once it has been reviewed and approved, exactly as on a project's Timeline tab.
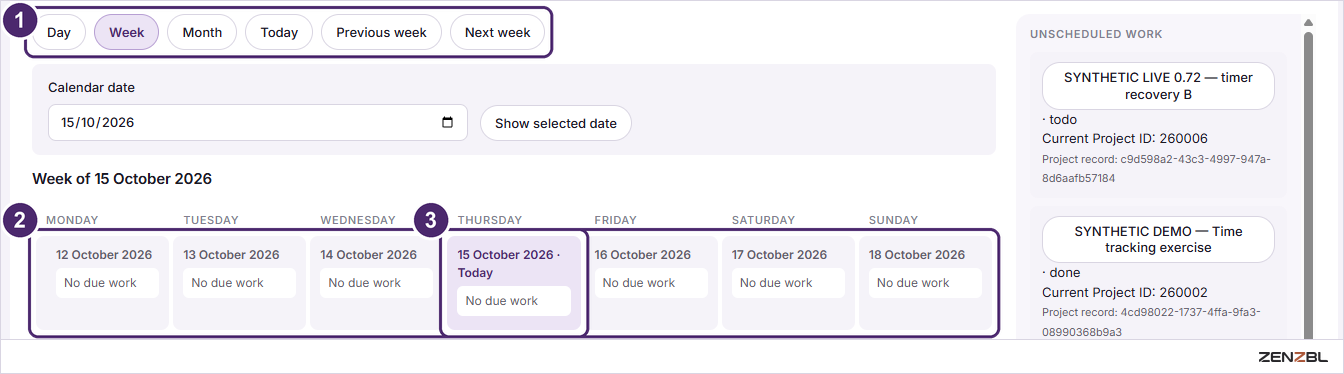
The week view
Week selected. Previous and Next now move a week at a time.
Seven days. Monday to Sunday, each with its due tasks.
Today. Marked in the day's heading.
Good to know: the calendar uses the workspace's business date and time zone (Australia/Sydney), and shows due dates only, not times.
My Work list
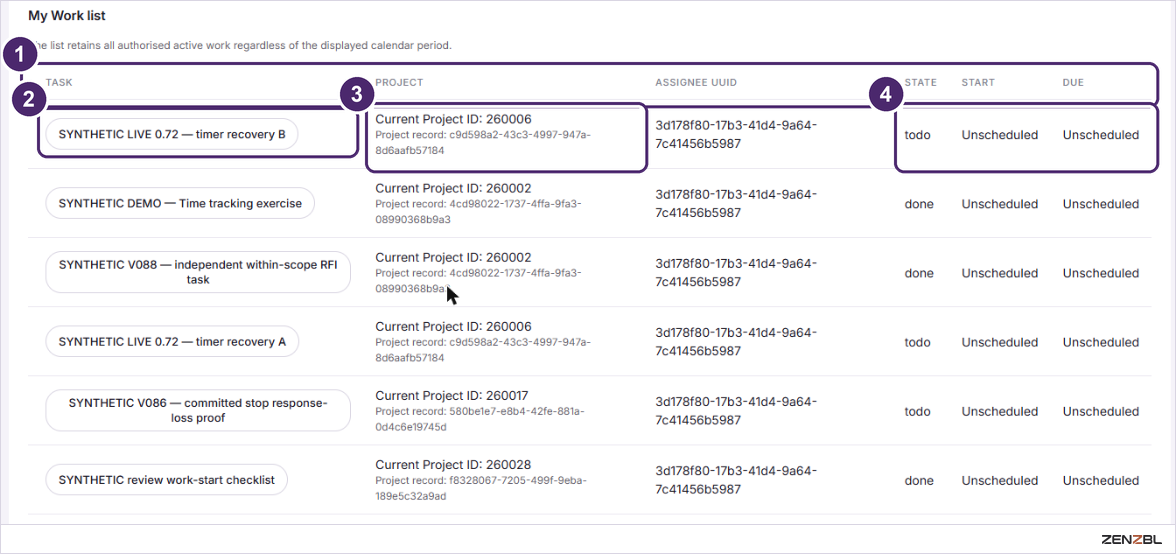
Under the calendar, the same tasks as a plain table. It always shows all your active work, whatever period the calendar is showing.
Columns. Task, project, assignee, state, start and due.
Task name. Click it to open the task in its project.
Project. The six-digit reference of the project the task belongs to.
State and dates.todo or done, and the start and due dates, or Unscheduled when there are none.
Good to know: the calendar only shows tasks that have a due date. If a task seems to be missing, look for it in the list or in the Unscheduled work column.
Inbox
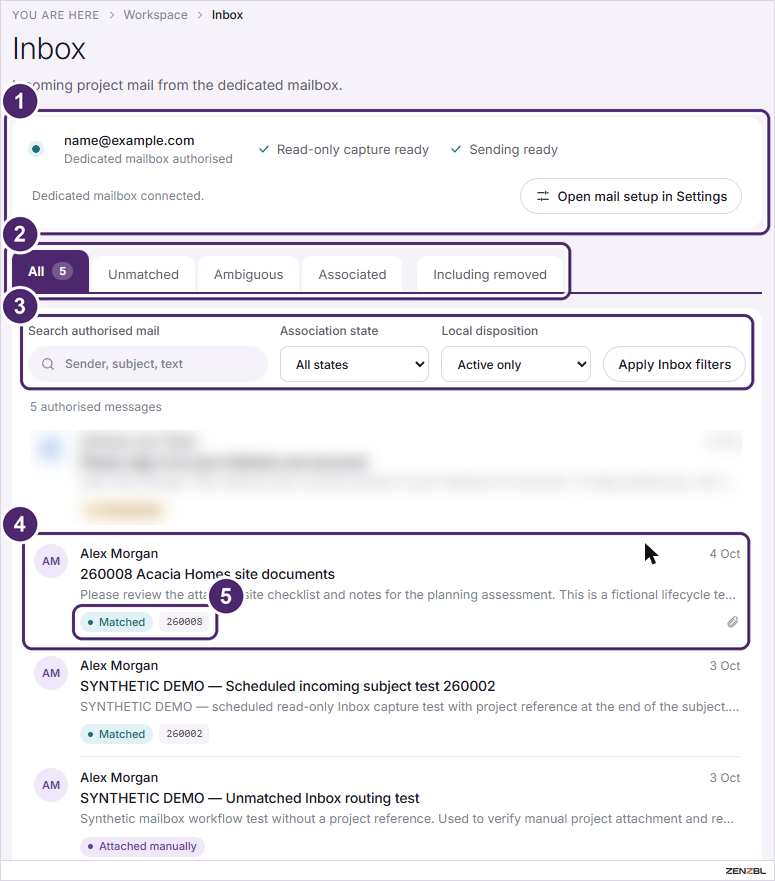
Email arriving in the workspace's dedicated mailbox, for every project you can see. Open it from Inbox in the side menu.
Mailbox status. Which mailbox is connected and whether capture and sending are ready. Open mail setup in Settings goes to Integrations.
Tabs.Unmatched and Ambiguous messages need a person to decide which project they belong to; Associated ones are already filed.
Search and filters. Then press Apply Inbox filters.
A message. Click it to read it and file it to a project.
Its project.Matched with the six-digit reference when the subject named a project, or Attached manually when someone filed it.
Good to know: only mail delivered to the connected mailbox's Inbox is captured. Subjects stay exactly as received, and removing a message here never deletes it from the real mailbox. Each project's own mail is on its Project mail tab.
Reminders
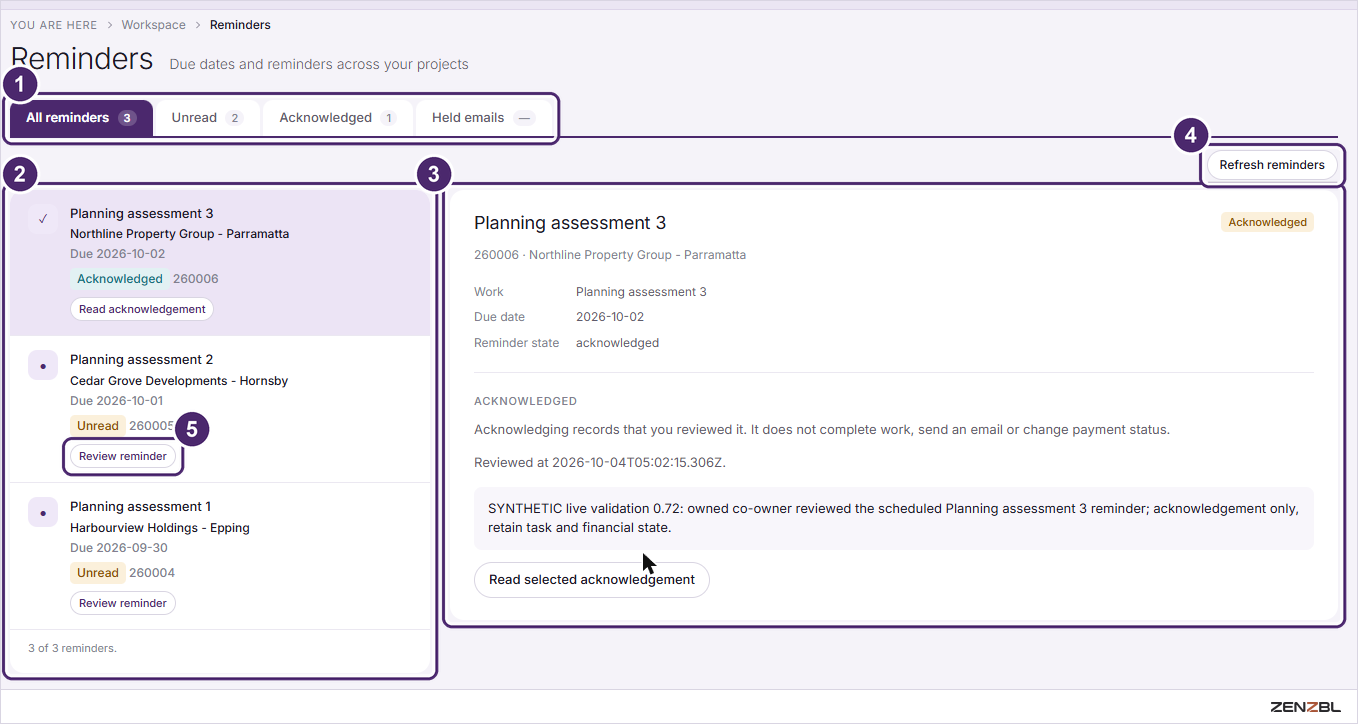
Due-date reminders for your tasks across all projects. Open it from Reminders in the side menu, or the bell icon at the top right.
Tabs. All, Unread, Acknowledged and Held emails, each with a count.
Your reminders. Each shows the task, the project, the due date and whether you have read it.
The selected reminder. Its work, due date and state.
Refresh reminders.
Review reminder. Opens it so you can acknowledge it.
Good to know: acknowledging a reminder only records that you have seen it. It does not complete the work, send an email or change any payment.
Information requests
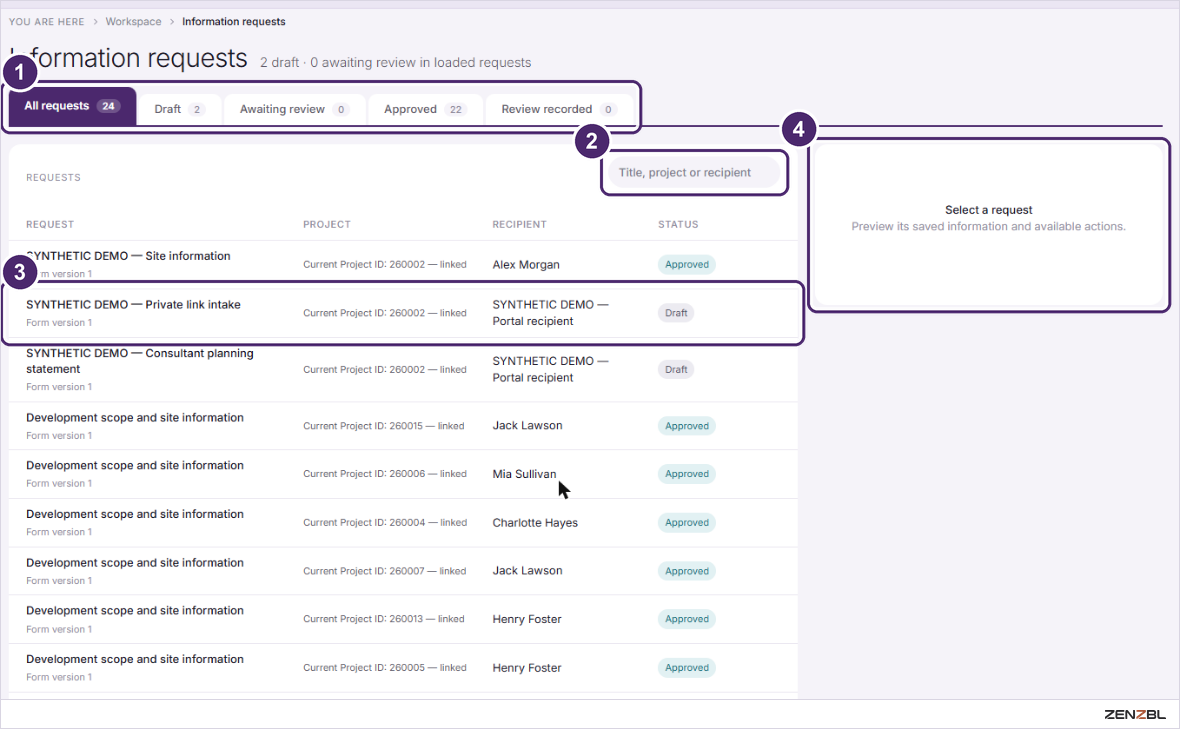
Every information request across your projects, in one list. Requests are created from a project's Information tab; this screen is for keeping track of them.
Tabs. All, Draft, Awaiting review, Approved and Review recorded, each with a count.
Search. By title, project or recipient.
A request. Its title, project, recipient and status.
Preview. Select a request to see its saved answers and what you can do next.
Good to know: a recipient's saved answers are drafts. Submitting freezes that exact version, which then waits under Awaiting review for a staff member.
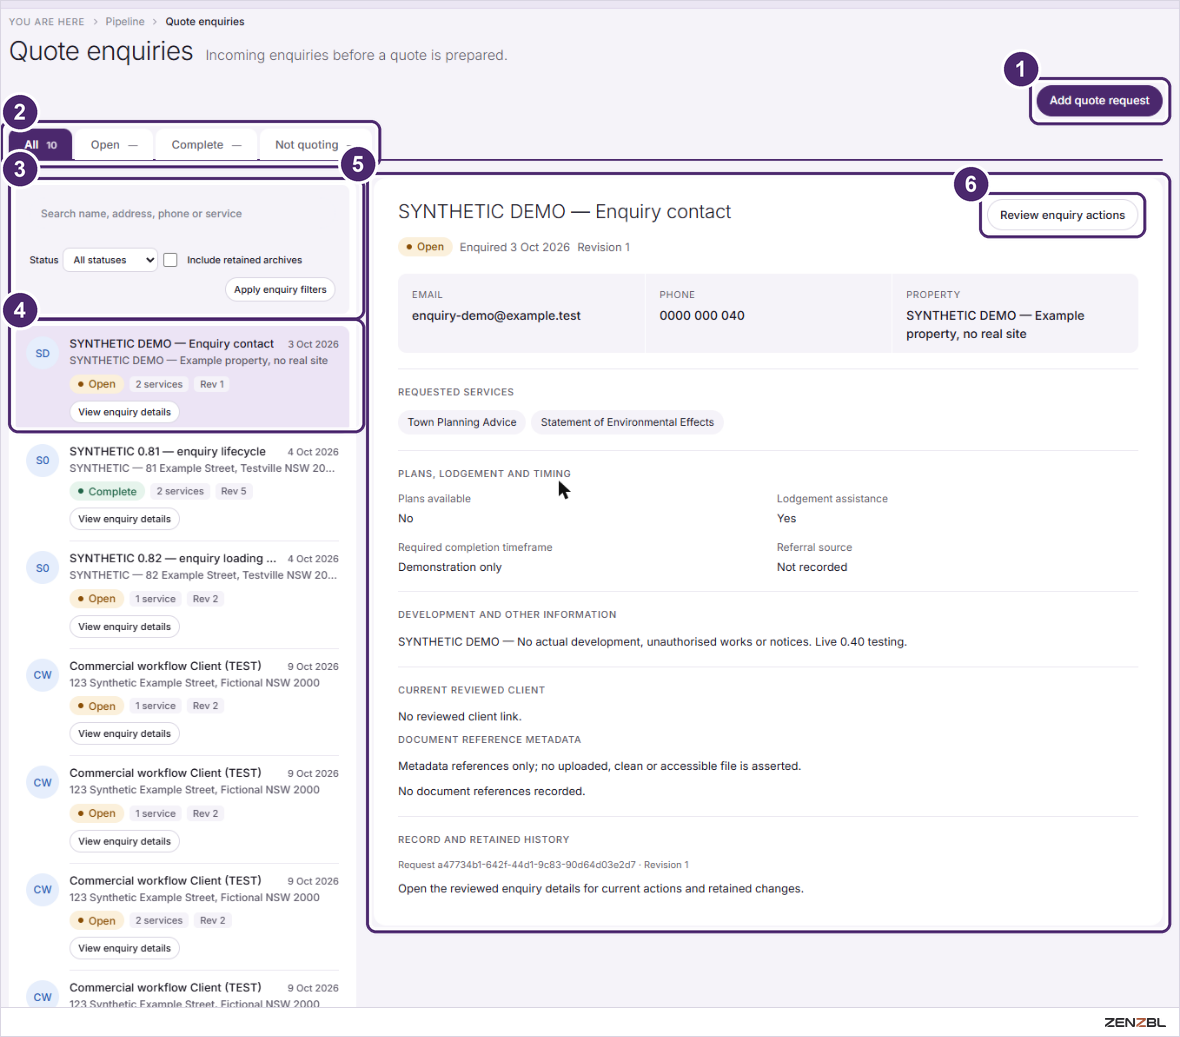
Quote enquiries
Enquiries from prospective clients, before a quote is prepared. Open it from Quote enquiries under Pipeline in the side menu.
Add quote request. Record a new enquiry by hand.
Tabs. All, Open, Complete and Not quoting.
Search and filters. By name, address, phone or service; tick Include retained archives for old ones.
An enquiry. Who, which property, its status and how many services were asked for.
The selected enquiry. Contact details, requested services, plans and timing, and any notes.
Review enquiry actions. Move it on: link a client, start a project, or mark it as not quoting.
Good to know: an enquiry is not yet a project. It becomes one when someone decides to quote and creates the project.
Lists
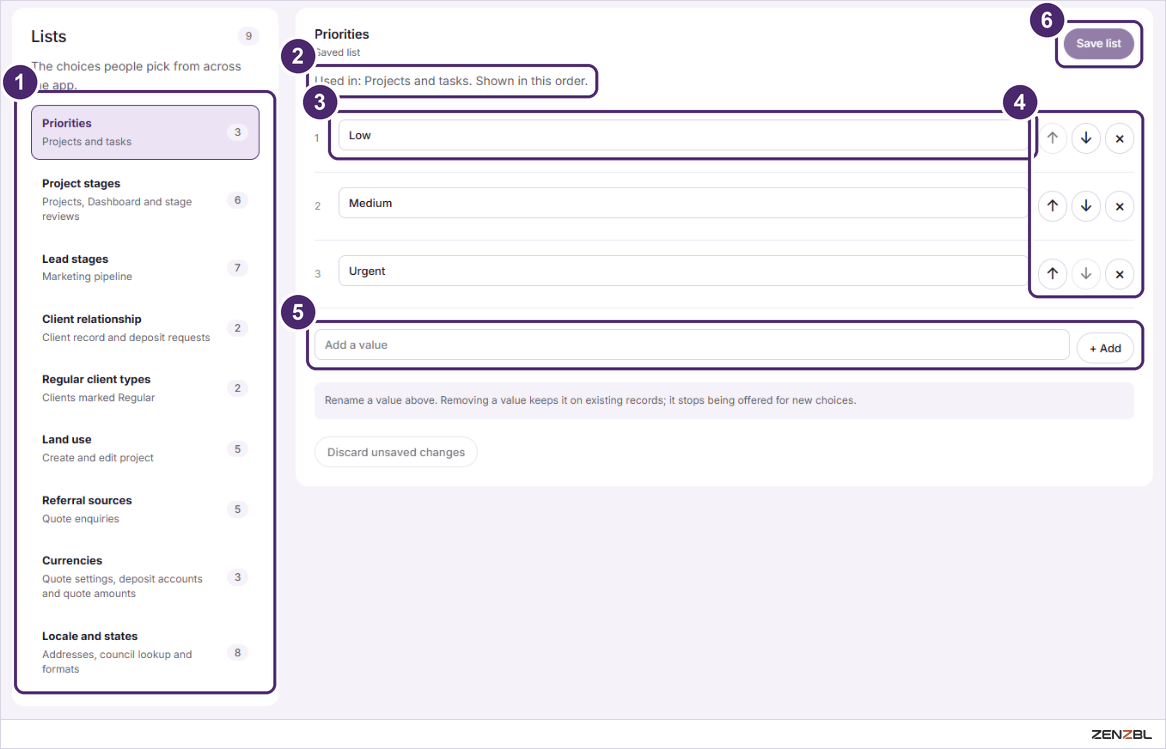
Nine lists of choices that feed the dropdowns across the app, from project priorities to the states offered in an address. This tab used to be called Priorities and held only that one list.
The nine lists. Click one to open it. The small print says where it is used, and the number is how many values it holds.
Used in. A reminder of which screens will show these choices, in the order you see here.
A value. Click into the box and type to rename it.
Arrows and cross. Up and down arrows reorder a value. The cross removes it.
Add a value. Type a new choice and press Add.
Save list. Each list saves on its own. Discard unsaved changes at the bottom puts the list back as it was.
What each list feeds
List
Where its choices appear
Values today
Priorities
Projects and tasks
Low, Medium, Urgent
Project stages
Projects, Dashboard and stage reviews
Pending, Prep, With Council/Certifier, RFI, Completed, Archived
Lead stages
Marketing pipeline
Introduction, Meeting, Quote, Follow Up, Last Chance, Customer, On-boarding
Existing client, Referral, Website, Online search, Social media
Currencies
Quote settings, deposit accounts and quote amounts
Australian dollar (default), New Zealand dollar, US dollar
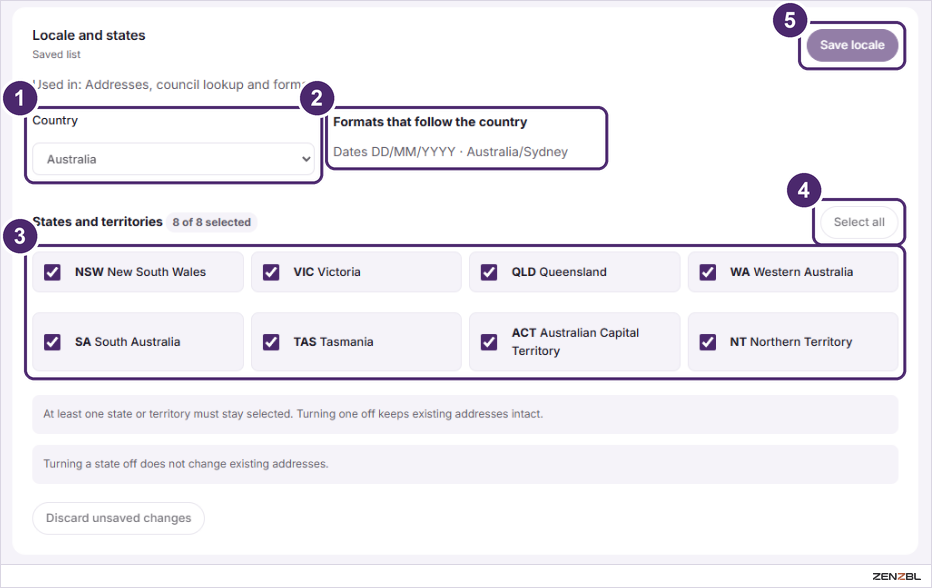
Locale and states
Addresses, council lookup and formats
Australia, with all 8 states and territories
Six of the nine work exactly like the picture above. Three have a twist.
Protected values
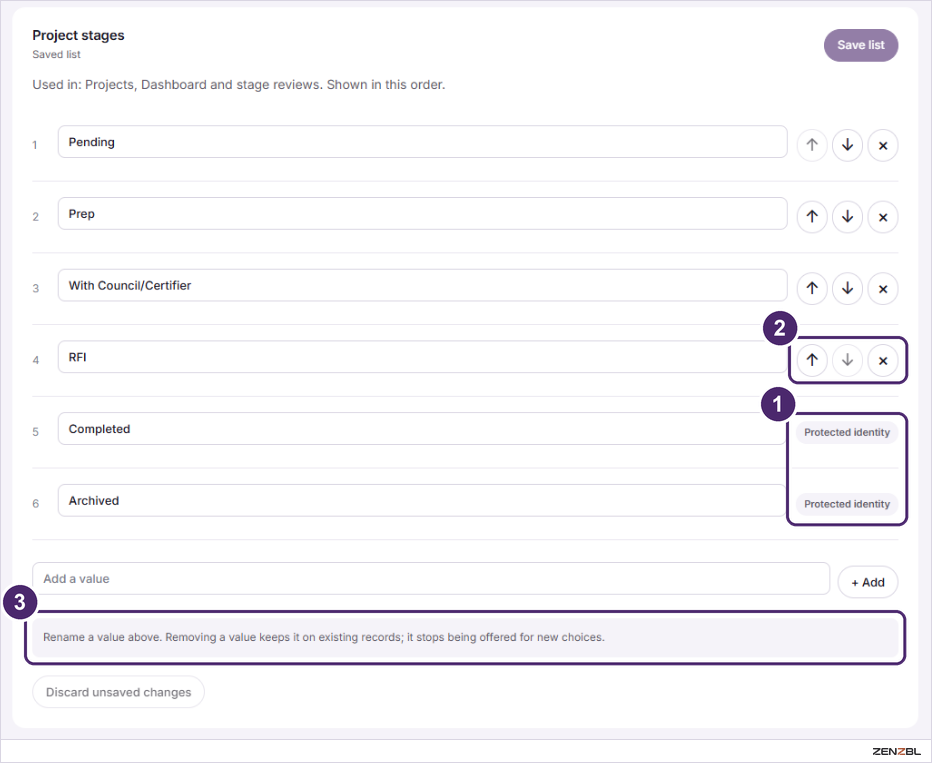
Some values do a job behind the scenes, so the app will not let you remove or reorder them. You can still rename them.
Protected identity.Completed and Archived have this label in place of the arrows and cross. Both values of Client relationship are protected in the same way.
A greyed arrow.RFI cannot move down, because a normal value cannot be placed after the protected ones.
The standing reminder. Removing a value keeps it on existing records; it only stops being offered for new choices.
Currencies
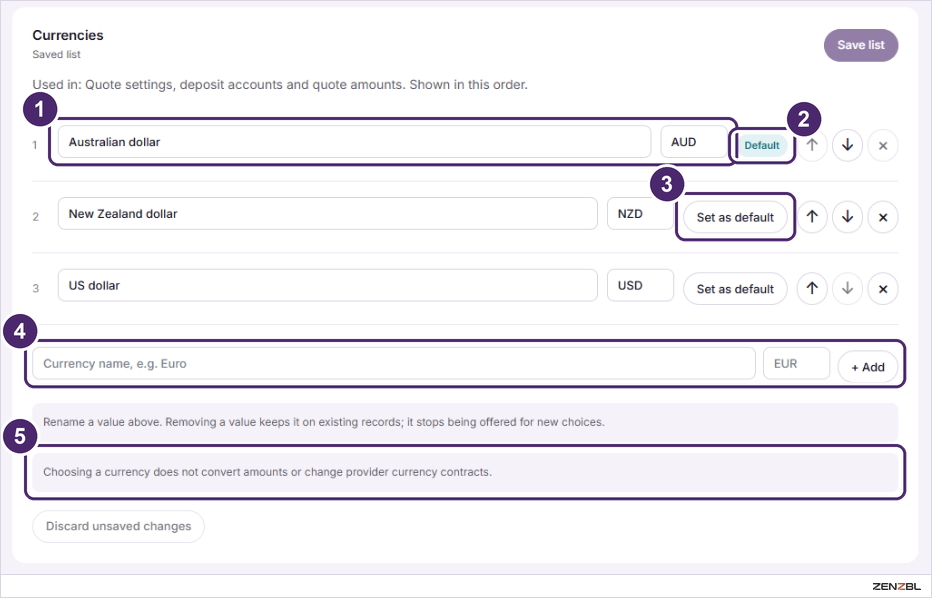
Name and code. Each currency has a name and a three-letter code.
Default. The currency offered first wherever a currency is chosen. Its cross is greyed out.
Set as default. Hands the Default label to a different currency.
Add a currency. Type the name and the code, then press Add.
The limit. Choosing a currency does not convert any amounts.
Locale and states
Country. The country the workspace operates in.
Formats that follow the country. Shown for information: dates as DD/MM/YYYY and the Australia/Sydney time zone.
States and territories. Untick one to stop offering it. At least one must stay ticked.
Select all. Ticks every state again.
Save locale. This list's own save button.
Good to know: turning a state off, like removing any list value, leaves existing records alone. Addresses already saved keep their state.
Services
The list of services the consultancy sells, such as Town Planning Advice or a Bushfire Report. Workflows, folders and templates all hang off a service, so this is the real starting point.
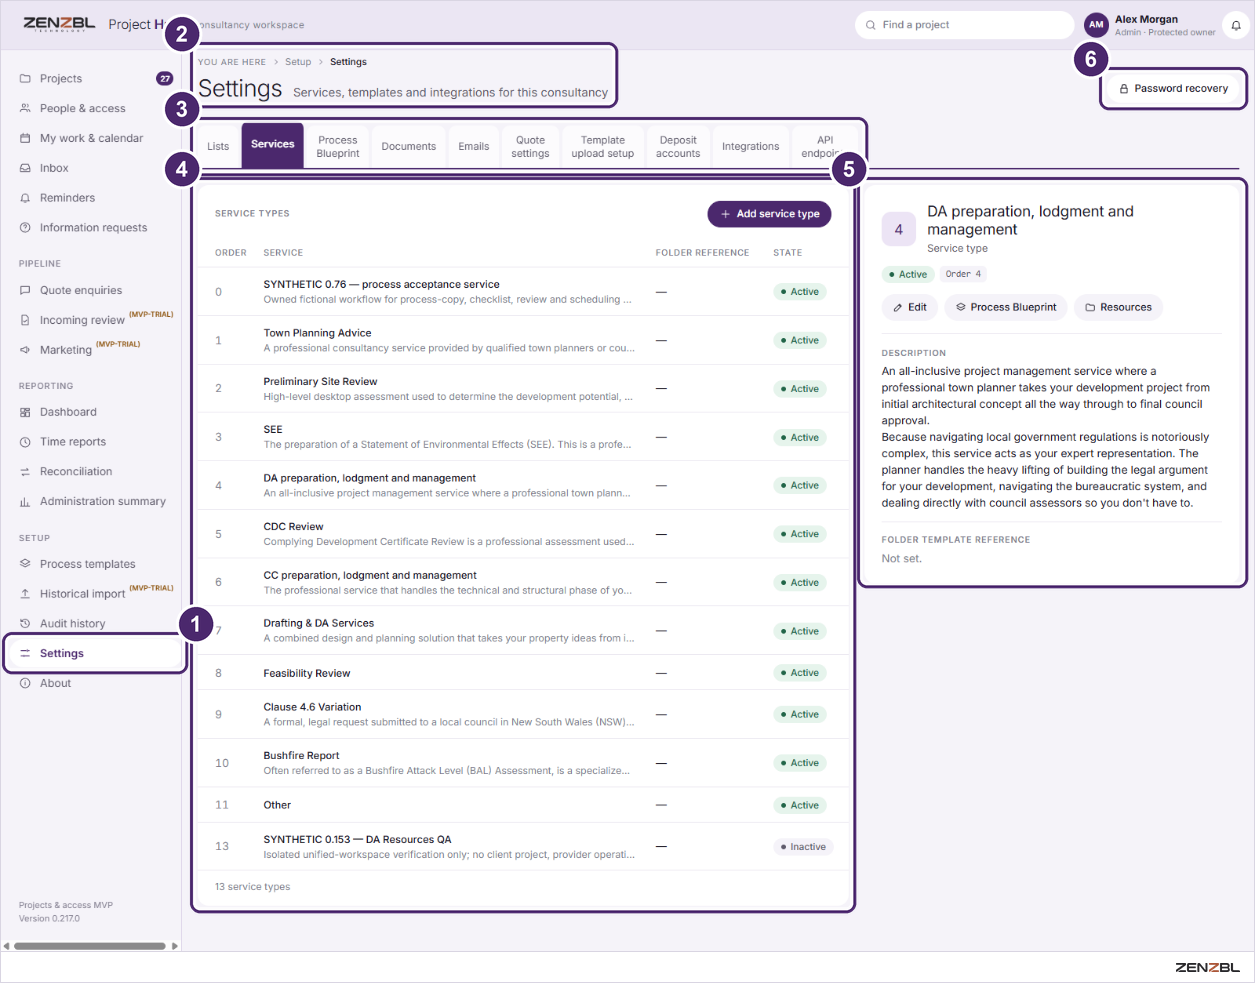
Settings in the side menu.
Breadcrumb and title.
The Settings tabs. Services is the second.
Service types. Click a row to select it. The number on the left is its display order. Add service type starts a new one.
The selected service.Edit changes its details; Process Blueprint and Resources jump to its workflow and its folders and templates.
Password recovery. A workspace-wide switch that lives above the tabs.
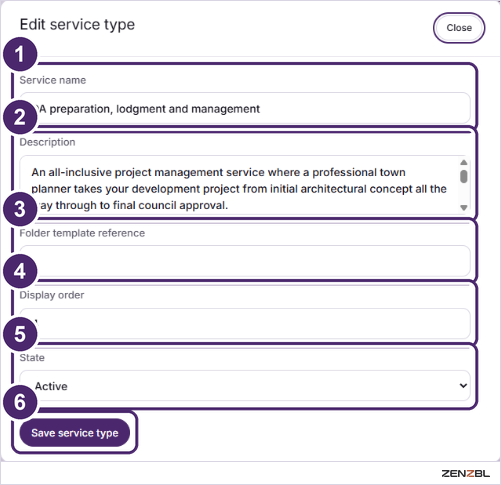
Editing a service
Service name.
Description. Shown to staff and on the enquiry form.
Folder template reference. Optional.
Display order. Where it appears in lists.
State. Active services are on offer; Inactive ones are kept but hidden from new work.
Save service type.
Good to know: projects that already use a service keep their details when you change it.
Process Blueprint, the short tour
One workspace for designing a service's workflow: the folders and templates it can hand out, the route a job takes, the checks at each stage, and what each stage produces.
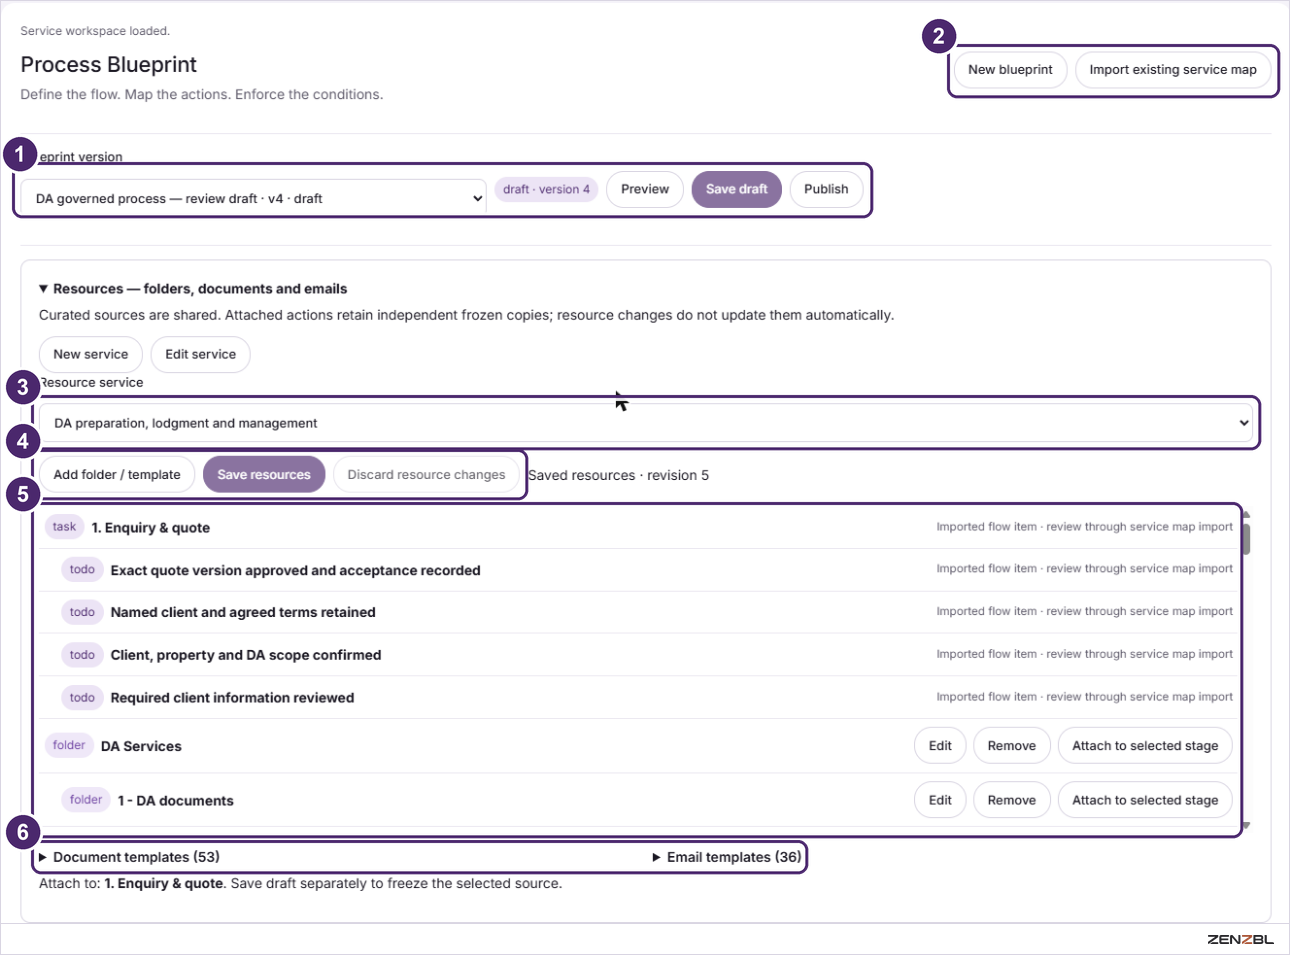
Open it from Settings › Process Blueprint, or press Process Blueprint on a selected service. The workspace has three parts, top to bottom.
Blueprint and version. Pick a blueprint and version. Preview, Save draft and Publish sit beside it.
New blueprint or Import existing service map.
Resources: the service. Folders, document templates and email templates are curated once per service.
Add folder / template, then Save resources.
The service's folders and tasks.Attach to selected stage hands one to a stage.
Document and email templates available to attach.
Below the resources is the canvas, where the route is drawn, and under it the panel for the selected stage. Both are covered in Reading the canvas and Stages and conditions.
Good to know: a draft affects nobody. Projects only use a published version, and only when someone starts it on the project. The full walkthrough starts at Process Blueprint in depth.
Documents
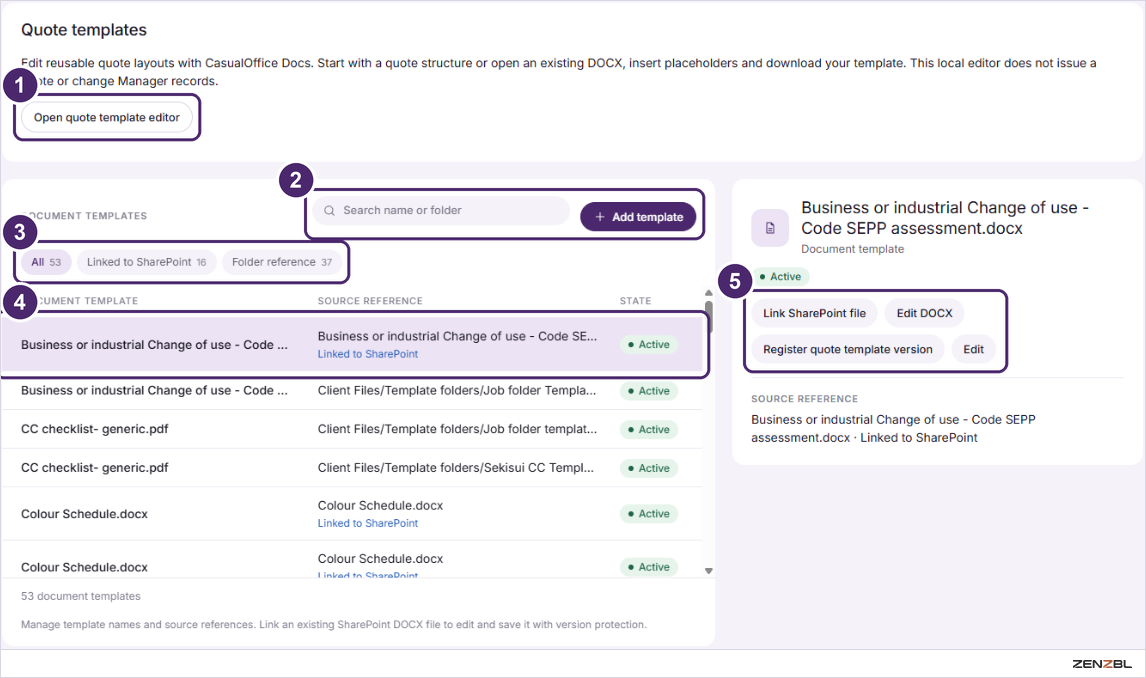
The library of document templates, such as checklists, schedules and assessment forms, and where each one lives.
Open quote template editor. A separate editor for quote layouts. It does not issue a quote.
Search and Add template. Search by name or folder, or register a new template.
Filter chips.Linked to SharePoint means the app can open the real file. Folder reference means the app only knows the path where the file sits.
A template row. Click it to see its details on the right.
Detail buttons.Link SharePoint file connects the entry to a real file. Edit DOCX opens a linked Word file for editing. Edit changes the name and source reference. Register quote template version marks the file as usable for quotes.
Good to know: the business's files stay in SharePoint and OneDrive. This tab is a catalogue that points at them, not a second copy.
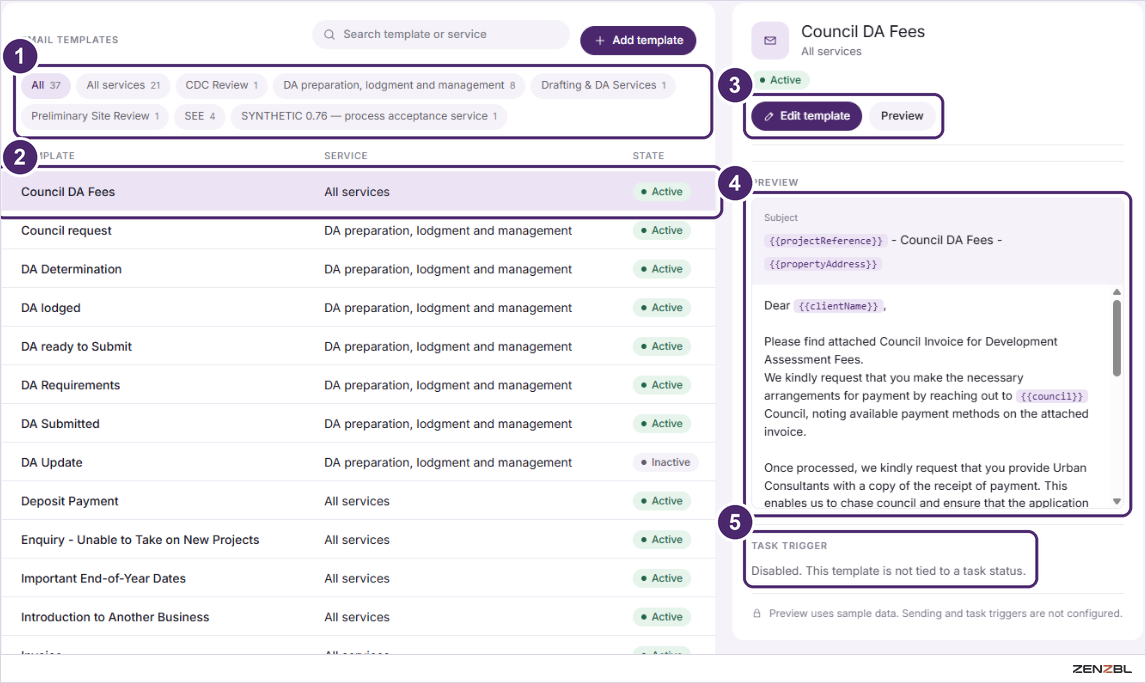
Emails
Ready-written emails for the moments that repeat, such as a deposit request, a DA lodged notice or a quote. Write each one once and reuse it on every job.
Service chips. Narrow the list to one service. All services templates work on any job.
A template row. Click it to preview it on the right. The pill shows Active or Inactive.
Edit template and Preview. Edit opens the editor shown below.
The preview. The purple words in double curly brackets are placeholders.
Task trigger. Shows whether this template is tied to a task status. Disabled means it is not.
Placeholders are the clever part, so here is the whole idea in one picture.
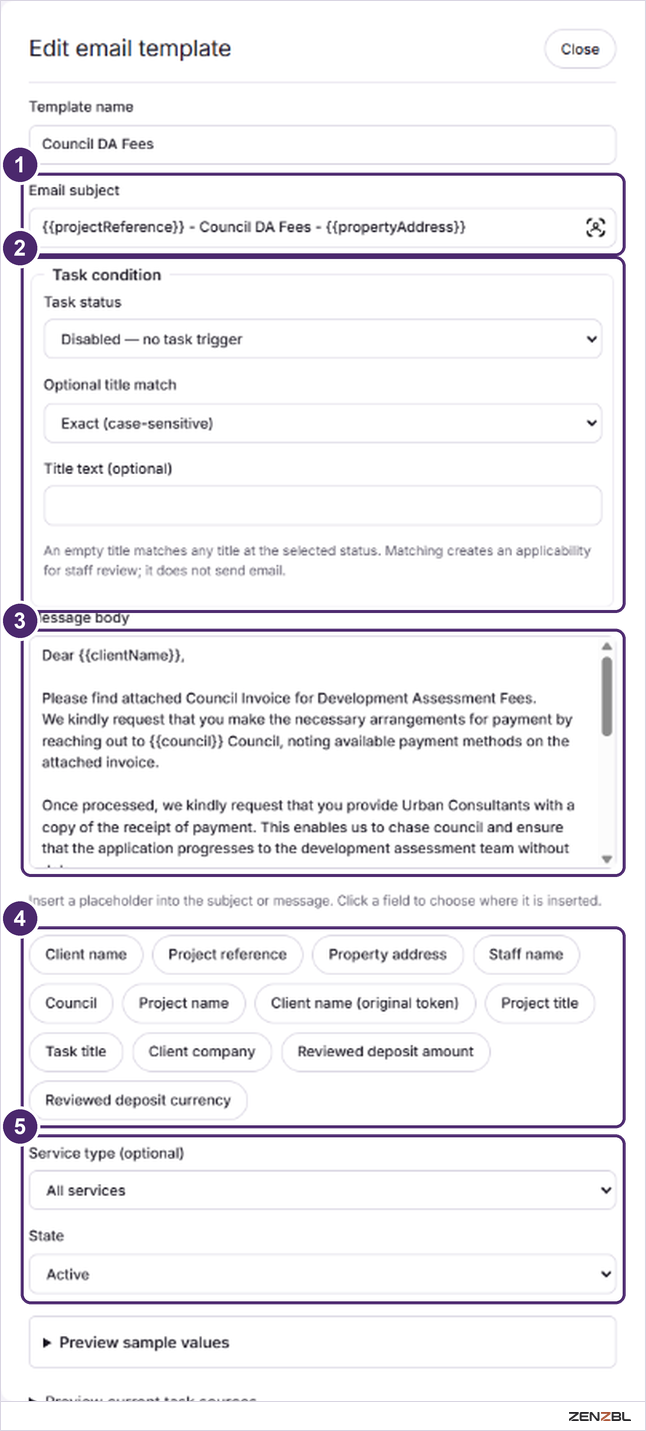
Press Edit template and the editor slides in from the right.
Email subject. Placeholders work here too.
Task condition. Optional. Ties the template to a task status so the app can suggest it at the right moment. Leave it on Disabled if unsure.
Message body. Plain typing, with placeholders wherever you want a blank filled.
Placeholder buttons. Click into the subject or the body first, then click a button. The placeholder lands where your cursor was.
Service type and State. Limit the template to one service, or switch it to Inactive to retire it without deleting it.
Good to know: the preview uses sample data. A task condition only flags a template for staff to review; it never sends an email on its own.
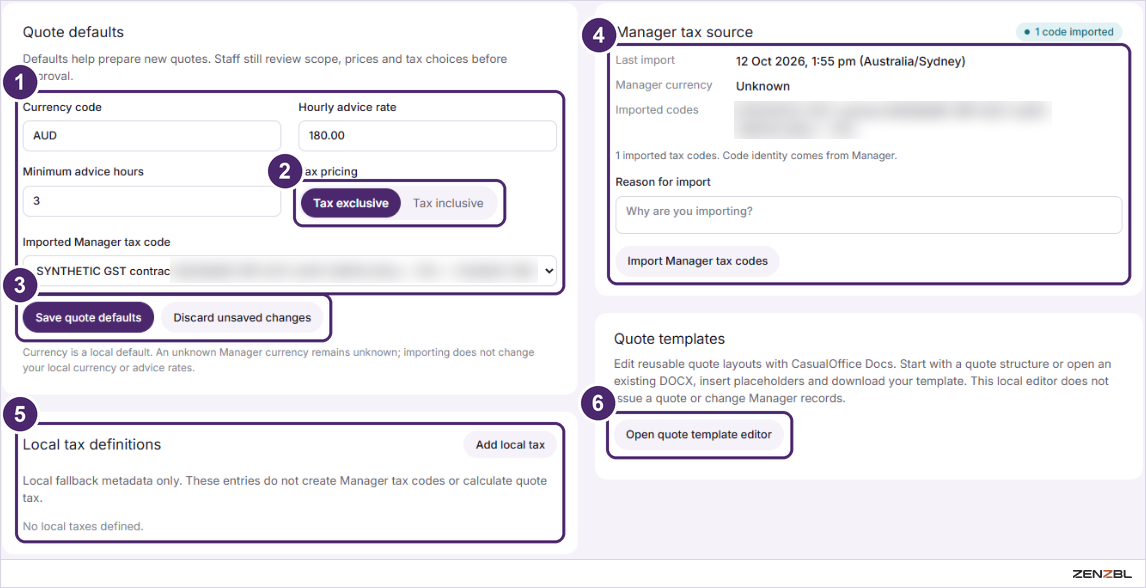
Quote settings
The numbers every new quote starts from, so staff are not retyping the hourly rate each time. Manager on this tab means the accounting system.
Quote defaults. Currency, hourly advice rate, minimum advice hours and the tax code to use.
Tax pricing. A two-way switch: prices shown before tax (exclusive) or with tax included (inclusive).
Save quote defaults.Discard unsaved changes beside it puts the form back as it was.
Manager tax source. Shows which tax codes were last brought in from accounting. To refresh them, type a reason and press Import Manager tax codes.
Local tax definitions. A fallback list for reference only. Entries here do not calculate tax on a quote.
Open quote template editor. The same editor you saw on the Documents tab.
Good to know: these are starting values, not final ones. Staff still check scope, prices and tax on every quote before it is approved. Importing tax codes never changes your currency or rates.
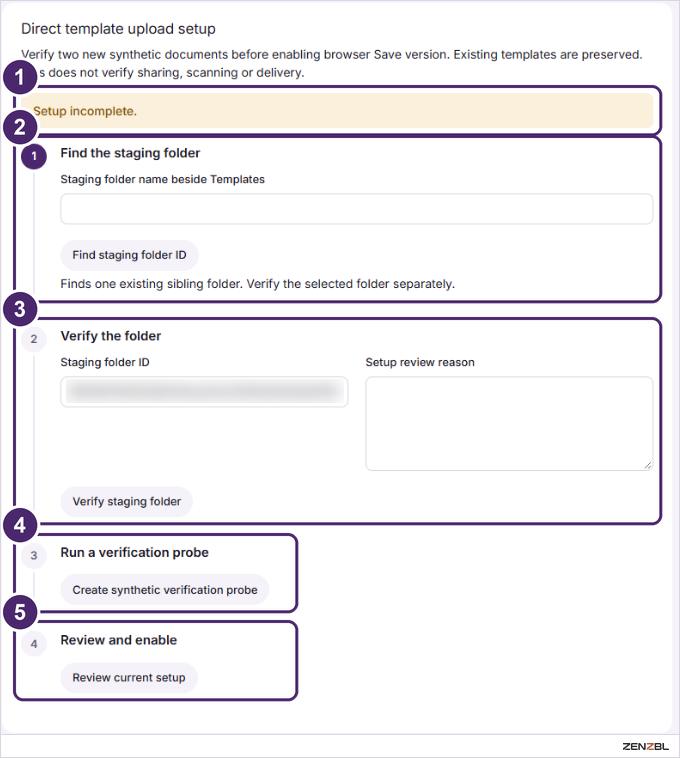
Template upload setup
A one-time safety check that lets people save new template versions straight from the browser. Most people will never need this tab; an Admin does it once.
Status banner. Tells you where things stand. Here it reads Setup incomplete.
Step 1, find the staging folder. Type the name of the practice folder that sits beside Templates, then press Find staging folder ID.
Step 2, verify the folder. Check the ID, type why you are doing this, and press Verify staging folder.
Step 3, run a probe. Creates two harmless test documents to prove saving works.
Step 4, review and enable. Look over the result and switch the feature on.
Good to know: the steps run top to bottom, and the purple number marks the one you are on. Existing templates are never touched. Passing this check says nothing about sharing, virus scanning or delivery.
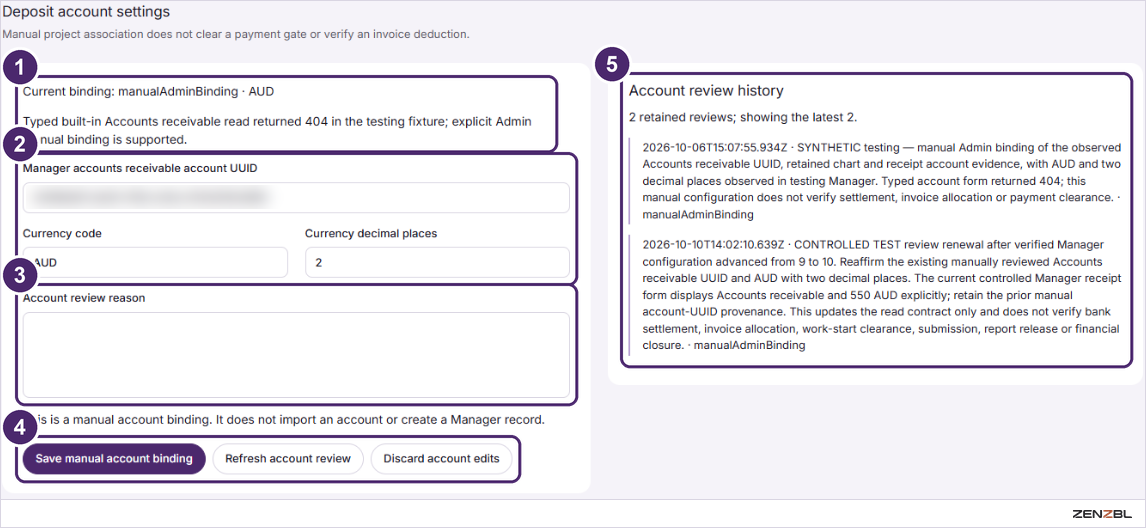
Deposit accounts
Telling the workspace which accounting account client deposits belong to. Another set-once Admin tab.
Current binding. The account in use today and how it was set.
Account details. The account ID from the accounting system, the currency code and the number of decimal places.
Account review reason. Say why you are changing it. The reason is kept.
Save manual account binding.Refresh account review rechecks the current one. Discard account edits undoes your typing.
Account review history. Every past change with its reason, oldest first.
Good to know: this is a label, not a transaction. Saving here does not create anything in the accounting system, does not confirm a payment and does not unlock any payment step on a project.
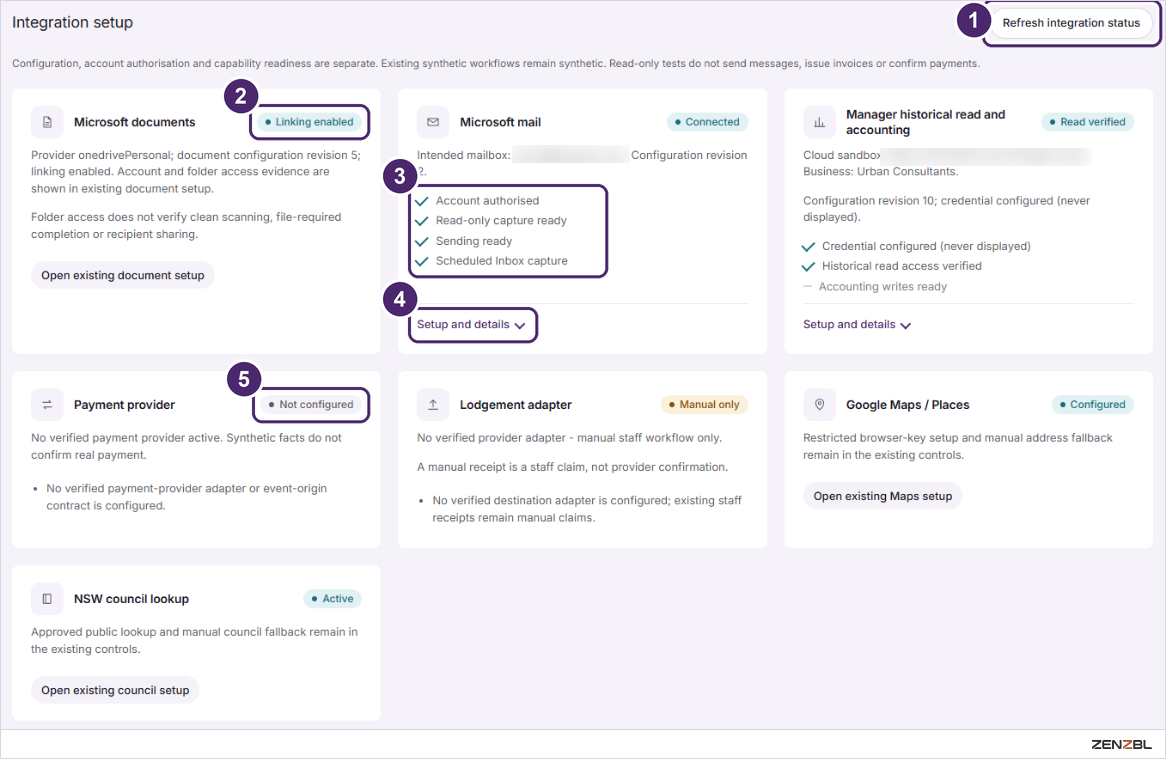
Integrations
A dashboard of everything the workspace is plugged into: Microsoft documents and mail, the accounting system, payments, lodgement, maps and the council lookup. Mostly you come here to look, not to change.
Refresh integration status. Asks every connection for its latest state.
Status pill. The one-word health of that connection. The key is below.
Tick list. What this connection is ready to do. A dash instead of a tick means not ready yet.
Setup and details. Opens the fine print and the setup buttons for that connection.
A grey pill. Nothing is connected for this one, and the card says so plainly.
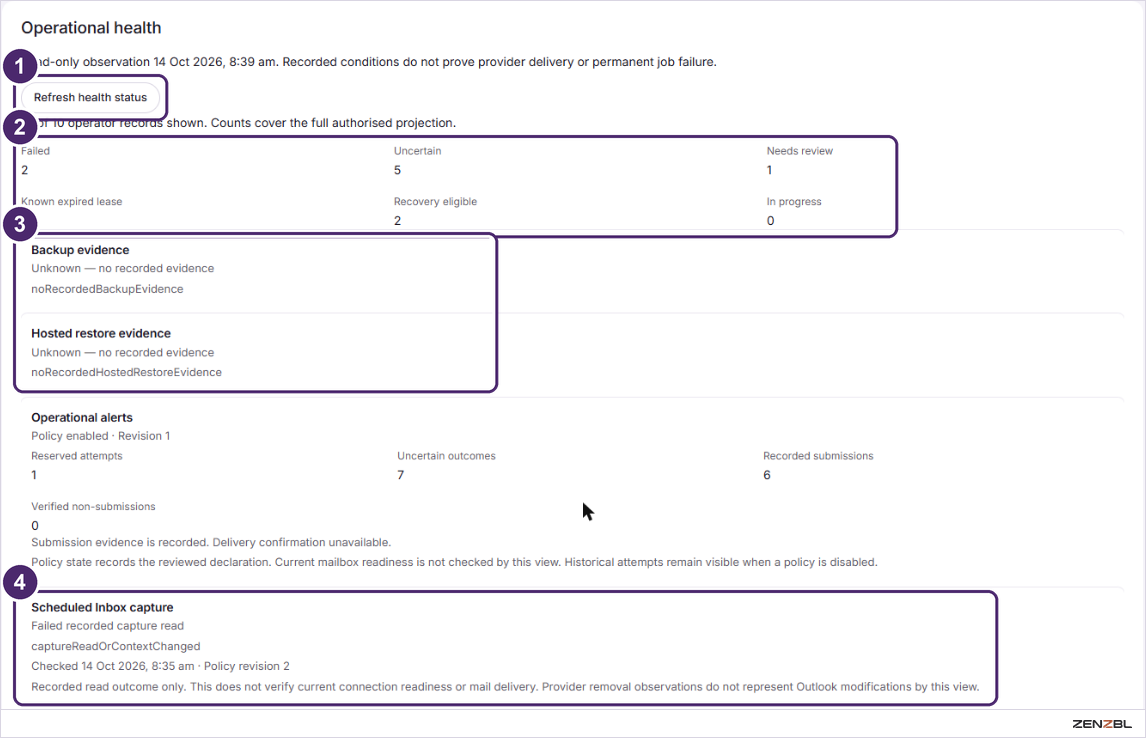
Scroll down and the page turns into a health report.
Refresh health status. Updates the report.
The counters. How many background jobs failed, are uncertain, or need a person to review them.
Backup and restore evidence. Whether proof of a backup and a restore has been recorded.
Scheduled Inbox capture. The result of the latest automatic mailbox check.
Good to know: this is the longest page in Settings; below the health report it lists every recorded job condition one by one. A count above zero is a prompt to tell an Admin, not a sign that something is broken for good.
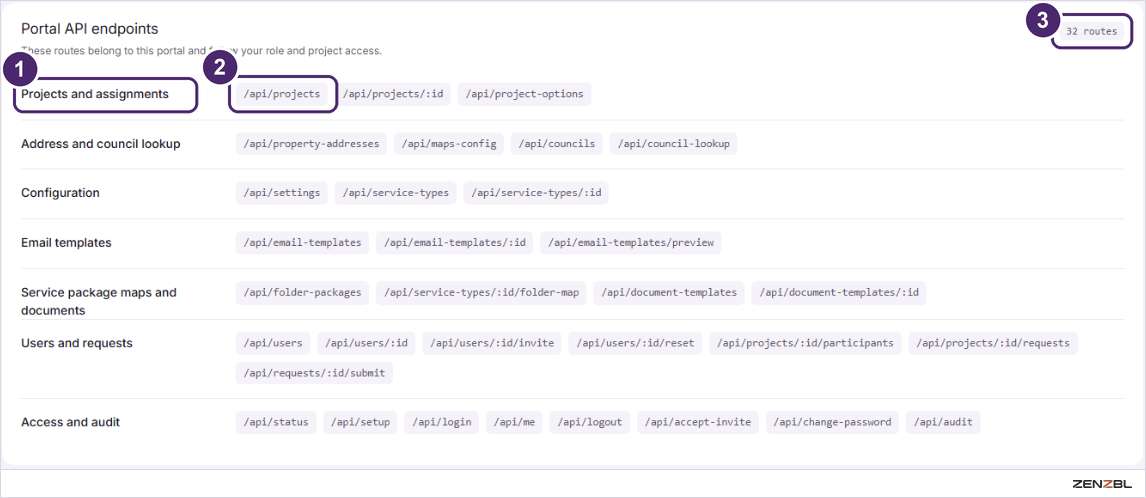
API endpoints
A reference list for developers. If the phrase "API endpoint" means nothing to you, you can skip this tab for the rest of your career.
Group name. The area of the app the addresses belong to.
A route. One address the app answers on.
Route count. 32 in total.
Good to know: there is nothing to click, change or break here. The routes obey the same role and project access rules as the screens do.
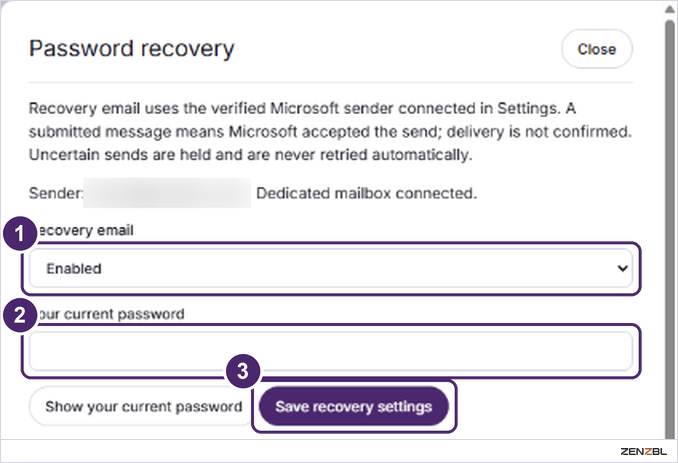
Password recovery
Deciding whether people who forget their password can be emailed a recovery message. The button sits at the top right of Settings, above the tabs.
Recovery email. Enabled or Disabled for the whole workspace.
Your current password. The app asks for it to confirm it is really you making the change.
Save recovery settings. Stores your choice.
Below these controls the panel lists Account recovery requests from people who are locked out. For each one: confirm who they are, press Open account, use Reset password there, and pass the private link to them yourself.
Good to know: a message marked as submitted means the mail service accepted it. It does not prove the email arrived. A send the app is unsure about is held and is never retried automatically.
Process Blueprint: the big idea
A Process Blueprint turns "how we usually do a DA" into a path a project must actually follow. The tab's own motto says it in three beats: define the flow, map the actions, enforce the conditions.
Everything in this category uses one worked example, the DA process: 1. Enquiry & quote, 2. Start the job, 3. Prepare the DA (a decision), 4. Ready to lodge, 5. Council assessment and 6. Complete & close.
Beat
What you build
Plain meaning
Define the flow
Stages, decisions and the connections between them
The route a job takes
Map the actions
Emails, documents, folders and manual jobs attached to a stage
What gets produced along the way
Enforce the conditions
A checklist on each stage
What must be true before the job may move on
One blueprint, many versions
You never edit a blueprint that is in use. You edit a draft, and when it is right you publish it. Publishing freezes that version for good. To change anything later, you create the next version and start again from a fresh draft.
Three consequences are worth learning now, because they explain most surprises later:
A draft affects nobody. The page labels it Saved draft · not used by projects.
A published version cannot be edited. The page labels it Published definition · frozen for project use, and every editing button disappears.
Publishing does not push changes onto running jobs. Each project starts its own copy of the process from a published version. Moving a project to a newer version is a deliberate step taken on that project, with a reason recorded, and its earlier history is kept.
Reading the canvas
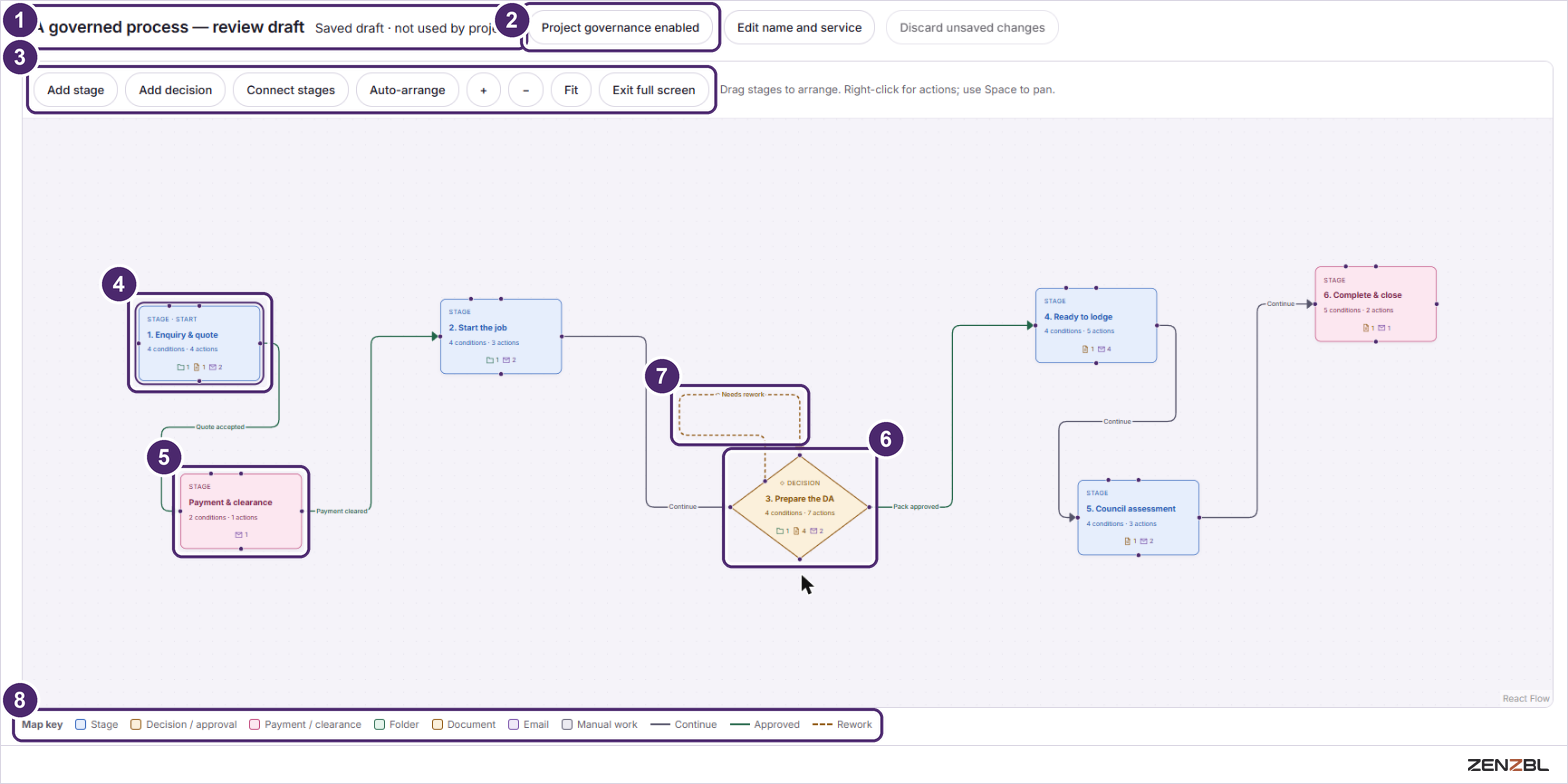
The canvas shows the route a job takes. Each box is a stage; the lines are the allowed ways forward, and back.
Name and state.Saved draft · not used by projects until it is published.
Project governance. When on, each stage sets the project's status and which business actions are allowed (see Stage settings).
Tools. Add stage, Add decision, Connect stages, Auto-arrange, zoom, Fit and Full screen.
The starting stage. Marked STAGE · START. Change it with Choose starting stage under the canvas.
A payment stage. Pink marks payment and clearance, kept separate from the work.
A decision. A diamond: the job goes one way or the other.
A rework loop. The dashed line sends work back to try again.
Map key. Colours for each kind of stage and action, and the three kinds of line: Continue, Approved and Rework.
Each card shows its type, its number and name, and a tally such as 4 conditions · 4 actions, with small icons for the folders, documents and emails attached.
Tips. Drag stages to arrange them, or press Auto-arrange. Right-click a stage for its options; hold Space and drag to move around. Open All branches and rework connections under the canvas for every connection as a plain sentence.
Building one, start to finish
There are two ways to begin, and both give you a draft.
Button
What it asks for
When to use it
New blueprint
A blueprint name and its service
You want a clean sheet
Import existing service map
A name for the new draft
The service already has a map of tasks and folders to start from
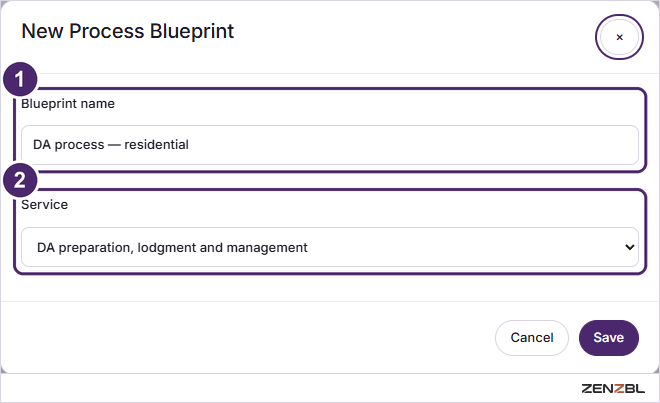
Blueprint name.
Service. The service this workflow belongs to.
From there, the build is seven moves:
Curate resources. Check the service's folders and templates in the Resources panel.
Add stage. One for each step of the job, in the order the work happens.
Add decision. Wherever the job can go two ways, such as approved or sent back.
Connect stages. Pick the stage a line leaves from, where it arrives, and a label. A line back to the same stage must be marked as rework.
Choose starting stage. Exactly one stage is where every project begins.
Save draft. A badge reading Unsaved draft changes appears whenever there is something to save.
Changed your mind?Discard unsaved changes returns you to the last saved draft. Edit name and service renames the blueprint or moves it to another service.
Stage settings and governance
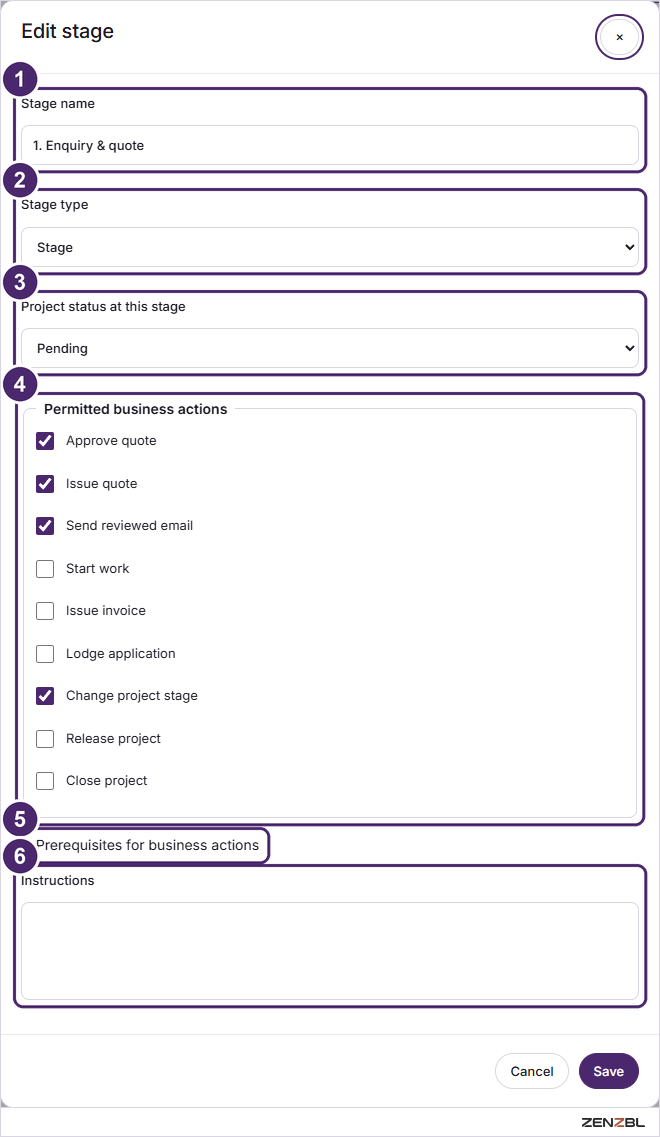
Click a stage, then Edit stage. With project governance on, these settings decide what can happen while a job is at this stage.
Stage name. Name stages as places, such as Ready to lodge.
Stage type. A normal stage, or a decision with two ways out.
Project status at this stage. What the project list shows while the job is here: Pending, Prep, With Council/Certifier, RFI, Completed or Archived.
Permitted business actions. What may be done here: approve or issue a quote, send a reviewed email, start work, issue an invoice, lodge, change stage, release or close the project. Anything unticked is blocked.
Prerequisites. Conditions that must be met before a particular action is allowed, for example start work only after payment clearance.
Instructions. Plain guidance for whoever works this stage.
Why it matters: a quote cannot be issued from the lodgement stage, and a project cannot be closed before its final stage. On a project, the Overview lists the blocked actions under Business action rules.
Stages and their conditions
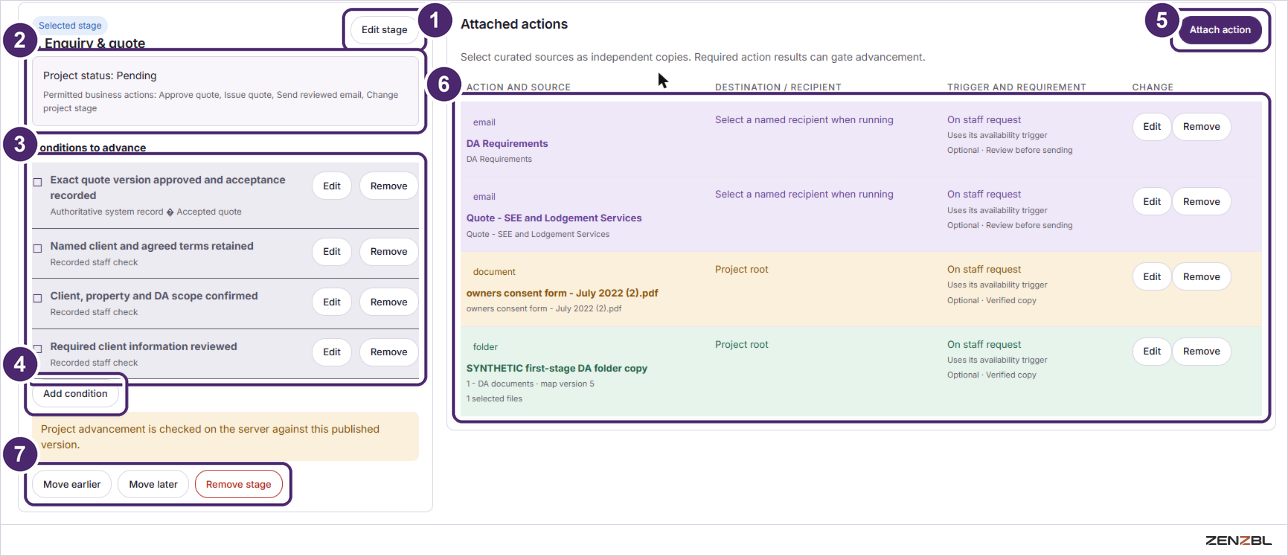
A condition is one line on a stage's checklist. Until every condition is met, the project cannot leave the stage.
Attached actions. Emails, documents and folder copies this stage produces.
Move earlier, Move later, Remove stage.
The evidence type decides who or what can tick the box.
Evidence type
The box is ticked when
Example
Recorded staff check
A team member records that it is done
Client, property and DA scope confirmed
Reviewed evidence
Work is submitted and a reviewer approves it
Application pack approved
Verified attached action
An action on this stage has a confirmed result
DA folders and document copies verified
Approved work-start clearance
The accepted scope is cleared to start
Work-start clearance recorded
Authoritative system record
The app's own record shows it
Exact quote version accepted
Optional payment / deposit gate
The agreed payment rule is met
Deposit before work starts
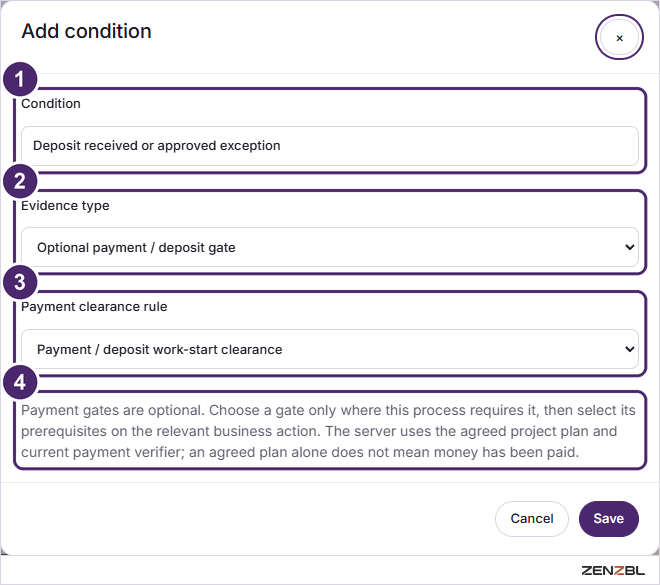
Payment gates
Condition.
Evidence type.
Payment clearance rule.
The app's own explanation.
A payment gate is optional; add one only where your process needs it. The four rules: payment / deposit work-start clearance (before work begins), agreed submission clearance (before lodging), agreed release clearance (before releasing final files) and zero outstanding accounting (nothing owing before closing).
Good to know: an agreed payment plan alone does not mean money has been paid. The app checks the payment record.
Attached actions
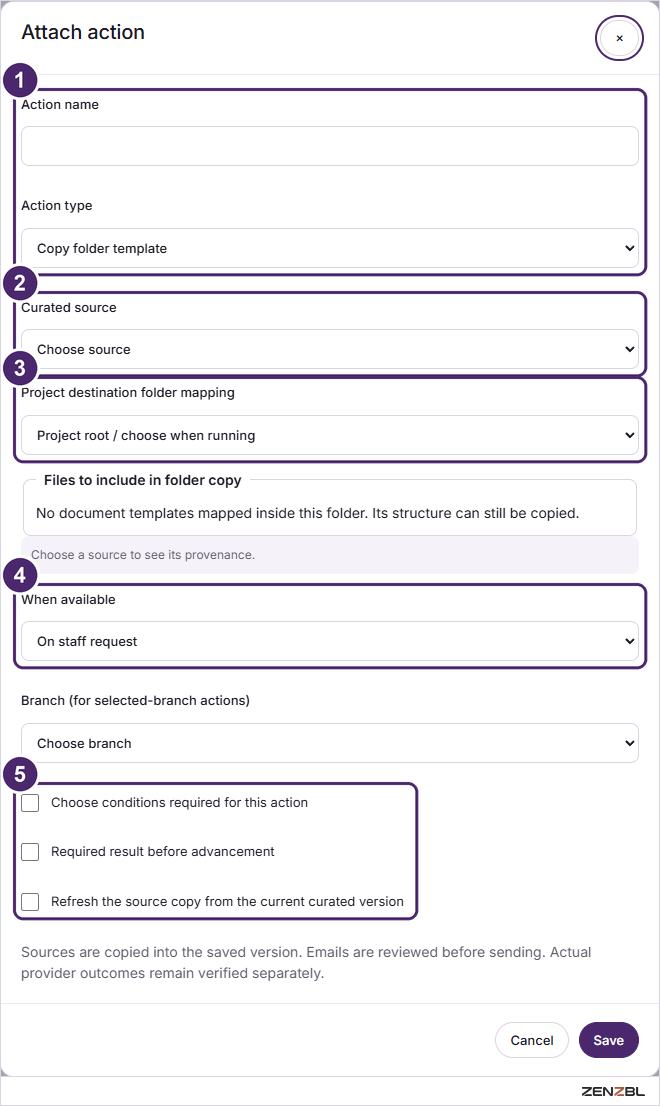
An attached action is something a stage produces: a folder copy, a document copy, an email draft, or a job for a person.
Name and type. Copy folder template, Copy document template, Prepare reviewed email, or Manual action.
Curated source. Which folder, document or email from the service's resources.
Destination. Which project folder the copy lands in, or choose when it runs.
When available. On staff request, on entering this stage, after approval, or on a chosen branch.
Requirements. Make its result required before the job moves on, or require certain conditions first.
You will read
On
Meaning
Verified copy
Folder and document copies
The copy is checked to exist before it counts
Review before sending
Emails
A draft is prepared for a person to review; preparing it does not send it
Recorded by staff
Manual actions
A person records that the job was done
Good to know: the source is copied into the saved version, so editing a template later does not quietly change a published workflow.
Preview, publish and the next version
Save draft. An unsaved draft cannot be published.
Preview. Lays every stage out in order with its ways forward, so a missing connection stands out. Preview changes nothing.
Publish and confirm. The version is frozen; its stages, checks and copied resources can no longer be edited.
Start it on a project. On the project's Overview, choose the published version and press Review and start process (see Your first project).
Change it later. Press Create next version, edit the new draft, and publish again.
Projects already running stay on the version they started with. Someone moves each project to the newer version when ready, giving a reason, and the project's history is kept.
Before you publish
One starting stage is set.
Every stage has at least one condition.
Every decision has a way forward and a way back, and rework lines are marked as rework.
Only essential actions are required, and payment gates are on the right stages.
Preview shows the route you expect.
Good habits and common slips
Five habits keep a blueprint easy to live with.
Name stages as places, conditions as facts.Ready to lodge is a place. Owner consent received is a fact someone can confirm.
Keep each checklist short. The DA process uses four conditions per stage. A stage with a dozen is usually two stages.
Make only the essential actions required. Every required action is one more thing that can hold a project still.
Give every decision a way forward and a way back. A decision with one exit is just a stage.
Preview before every publish. A published version cannot be corrected, only replaced.
Slip
What you will notice
Fix
Editing buttons are missing
The version is published
Press Create next version and work in the new draft
Publish will not go through
The draft has unsaved changes
Press Save draft first
A stage lets everything through
It has no conditions
Add at least one condition
A project is stuck on a stage
A condition is unmet or a required action has no verified result
Open the project's process and see which box is empty
A loop will not save
A line back to the same stage is not marked as rework
Edit the connection and mark it as rework
A project ignores your new version
It is still on the older one
Move that project to the new version from the project itself
Add a choice to a list
For example, a new priority called High.
Open the Lists tab and click the list you want, such as Priorities.
Type the new value in the box at the bottom and press Add.
Use the arrows to put it where you want it in the order.
The handful of ideas the whole app is built on. Learn these and every screen makes more sense.
Projects and their parts
Idea
What it means
Where you meet it
Project reference
A six-digit number, allocated when a project is first saved
Every list row, the project header, outgoing email subjects
Stage
Where a project is: Pending, Prep, With Council/Certifier, RFI, Completed or Archived. Completed and Archived projects are hidden from the list by default
How many of the project's twelve key details are filled in
Overview's ring, with the missing items listed
People and access
Idea
What it means
Where you meet it
Role
Admin manages all users and projects, Manager issues requests on assigned projects, Staff views assigned projects. Clients and other outsiders are external users